OpenAI Cookbook -- Curated Best Practices
本文为开源社区精选内容,由 OpenAI 原创。 文中链接将跳转到原始仓库,部分图片可能加载较慢。
查看原始来源AI 导读
OpenAI Cookbook -- Curated Best Practices A curated selection of the most impactful articles from OpenAI's official Cookbook (72K+ stars). Covers LLM fundamentals, agent building, embeddings, vector...
OpenAI Cookbook -- Curated Best Practices
A curated selection of the most impactful articles from OpenAI's official Cookbook (72K+ stars). Covers LLM fundamentals, agent building, embeddings, vector databases, prompt engineering, reasoning models, and the MCP protocol.
How to work with large language models
How large language models work
Large language models are functions that map text to text. Given an input string of text, a large language model predicts the text that should come next.
The magic of large language models is that by being trained to minimize this prediction error over vast quantities of text, the models end up learning concepts useful for these predictions. For example, they learn:
- how to spell
- how grammar works
- how to paraphrase
- how to answer questions
- how to hold a conversation
- how to write in many languages
- how to code
- etc.
They do this by “reading” a large amount of existing text and learning how words tend to appear in context with other words, and uses what it has learned to predict the next most likely word that might appear in response to a user request, and each subsequent word after that.
GPT-3 and GPT-4 power many software products, including productivity apps, education apps, games, and more.
How to control a large language model
Of all the inputs to a large language model, by far the most influential is the text prompt.
Large language models can be prompted to produce output in a few ways:
- Instruction: Tell the model what you want
- Completion: Induce the model to complete the beginning of what you want
- Scenario: Give the model a situation to play out
- Demonstration: Show the model what you want, with either:
- A few examples in the prompt
- Many hundreds or thousands of examples in a fine-tuning training dataset
An example of each is shown below.
Instruction prompts
Write your instruction at the top of the prompt (or at the bottom, or both), and the model will do its best to follow the instruction and then stop. Instructions can be detailed, so don't be afraid to write a paragraph explicitly detailing the output you want, just stay aware of how many tokens the model can process.
Example instruction prompt:
Extract the name of the author from the quotation below.

“Some humans theorize that intelligent species go extinct before they can expand into outer space. If they're correct, then the hush of the night sky is the silence of the graveyard.”
― Ted Chiang, Exhalation
Output:
Ted Chiang
Completion prompt example
Completion-style prompts take advantage of how large language models try to write text they think is most likely to come next. To steer the model, try beginning a pattern or sentence that will be completed by the output you want to see. Relative to direct instructions, this mode of steering large language models can take more care and experimentation. In addition, the models won't necessarily know where to stop, so you will often need stop sequences or post-processing to cut off text generated beyond the desired output.
Example completion prompt:
“Some humans theorize that intelligent species go extinct before they can expand into outer space. If they're correct, then the hush of the night sky is the silence of the graveyard.”
― Ted Chiang, Exhalation

The author of this quote is
Output:
Ted Chiang
Scenario prompt example
Giving the model a scenario to follow or role to play out can be helpful for complex queries or when seeking imaginative responses. When using a hypothetical prompt, you set up a situation, problem, or story, and then ask the model to respond as if it were a character in that scenario or an expert on the topic.
Example scenario prompt:
Your role is to extract the name of the author from any given text

“Some humans theorize that intelligent species go extinct before they can expand into outer space. If they're correct, then the hush of the night sky is the silence of the graveyard.”
― Ted Chiang, Exhalation
Output:
Ted Chiang
Demonstration prompt example (few-shot learning)
Similar to completion-style prompts, demonstrations can show the model what you want it to do. This approach is sometimes called few-shot learning, as the model learns from a few examples provided in the prompt.
Example demonstration prompt:
Quote:
“When the reasoning mind is forced to confront the impossible again and again, it has no choice but to adapt.”
― N.K. Jemisin, The Fifth Season
Author: N.K. Jemisin

Quote:
“Some humans theorize that intelligent species go extinct before they can expand into outer space. If they're correct, then the hush of the night sky is the silence of the graveyard.”
― Ted Chiang, Exhalation
Author:
Output:
Ted Chiang
Fine-tuned prompt example
With enough training examples, you can fine-tune a custom model. In this case, instructions become unnecessary, as the model can learn the task from the training data provided. However, it can be helpful to include separator sequences (e.g., -> or ### or any string that doesn't commonly appear in your inputs) to tell the model when the prompt has ended and the output should begin. Without separator sequences, there is a risk that the model continues elaborating on the input text rather than starting on the answer you want to see.
Example fine-tuned prompt (for a model that has been custom trained on similar prompt-completion pairs):
“Some humans theorize that intelligent species go extinct before they can expand into outer space. If they're correct, then the hush of the night sky is the silence of the graveyard.”
― Ted Chiang, Exhalation

###
Output:
Ted Chiang
Code Capabilities
Large language models aren't only great at text - they can be great at code too. OpenAI's GPT-4 model is a prime example.
GPT-4 powers numerous innovative products, including:
- GitHub Copilot (autocompletes code in Visual Studio and other IDEs)
- Replit (can complete, explain, edit and generate code)
- Cursor (build software faster in an editor designed for pair-programming with AI)
GPT-4 is more advanced than previous models like gpt-3.5-turbo-instruct. But, to get the best out of GPT-4 for coding tasks, it's still important to give clear and specific instructions. As a result, designing good prompts can take more care.
More prompt advice
For more prompt examples, visit OpenAI Examples.
In general, the input prompt is the best lever for improving model outputs. You can try tricks like:
- Be more specific E.g., if you want the output to be a comma separated list, ask it to return a comma separated list. If you want it to say "I don't know" when it doesn't know the answer, tell it 'Say "I don't know" if you do not know the answer.' The more specific your instructions, the better the model can respond.
- Provide Context: Help the model understand the bigger picture of your request. This could be background information, examples/demonstrations of what you want or explaining the purpose of your task.
- Ask the model to answer as if it was an expert. Explicitly asking the model to produce high quality output or output as if it was written by an expert can induce the model to give higher quality answers that it thinks an expert would write. Phrases like "Explain in detail" or "Describe step-by-step" can be effective.
- Prompt the model to write down the series of steps explaining its reasoning. If understanding the 'why' behind an answer is important, prompt the model to include its reasoning. This can be done by simply adding a line like "Let's think step by step" before each answer.
Techniques to improve reliability
When GPT-3 fails on a task, what should you do?
- Search for a better prompt that elicits more reliable answers?
- Invest in thousands of examples to fine-tune a custom model?
- Assume the model is incapable of the task, and move on?
There is no simple answer - it depends. However, if your task involves logical reasoning or complexity, consider trying the techniques in this article to build more reliable, high-performing prompts.
Why GPT-3 fails on complex tasks
If you were asked to multiply 13 by 17, would the answer pop immediately into your mind? For most of us, probably not. Yet, that doesn't mean humans are incapable of two-digit multiplication. With a few seconds, and some pen and paper, it's not too taxing to work out that 13 x 17 = 130 + 70 + 21 = 221.
Similarly, if you give GPT-3 a task that's too complex to do in the time it takes to calculate its next token, it may confabulate an incorrect guess. Yet, akin to humans, that doesn't necessarily mean the model is incapable of the task. With some time and space to reason things out, the model still may be able to answer reliably.
As an example, if you ask gpt-3.5-turbo-instruct the following math problem about juggling balls, it answers incorrectly:
Q: A juggler has 16 balls. Half of the balls are golf balls and half of the golf balls are blue. How many blue golf balls are there?
A:
There are 8 blue golf balls.
Does this mean that GPT-3 cannot do simple math problems? No; in fact, it turns out that by prompting the model with Let's think step by step, the model solves the problem reliably:
Q: A juggler has 16 balls. Half of the balls are golf balls and half of the golf balls are blue. How many blue golf balls are there?
A: Let's think step by step.
There are 16 balls in total.
Half of the balls are golf balls.
That means that there are 8 golf balls.
Half of the golf balls are blue.
That means that there are 4 blue golf balls.
Of course, it's hard to tell from only a single example whether this Let's think step by step trick actually works in general or just got lucky on this particular problem. But it really does work. On a benchmark of word math problems, the Let's think step by step trick raised GPT-3's solve rate massively, from a worthless 18% to a decent 79%!
Model capabilities depend on context
When learning to work with GPT-3, one common conceptual mistake is to believe that its capabilities are fixed across all contexts. E.g., if GPT-3 gets a simple logic question wrong, then it must be incapable of simple logic.
But as the Let's think step by step example illustrates, apparent failures of GPT-3 can sometimes be remedied with a better prompt that helps the model steer itself toward the correct output.
How to improve reliability on complex tasks
The rest of this article shares techniques for improving reliability of large language models on complex tasks. Although some of the techniques are specific to certain types of problems, many of them are built upon general principles that can be applied to a wide range of tasks, e.g.:
- Give clearer instructions
- Split complex tasks into simpler subtasks
- Structure the instruction to keep the model on task
- Prompt the model to explain before answering
- Ask for justifications of many possible answers, and then synthesize
- Generate many outputs, and then use the model to pick the best one
- Fine-tune custom models to maximize performance
Split complex tasks into simpler tasks
One way to give a model more time and space to think is to break tasks into simpler pieces.
As an example, consider a task where we ask the model a multiple-choice question about some text - in this case, a game of Clue. When asked directly, gpt-3.5-turbo-instruct isn't able to put clues 3 & 5 together, and answers incorrectly:
Use the following clues to answer the following multiple-choice question.

Clues:
1. Miss Scarlett was the only person in the lounge.
2. The person with the pipe was in the kitchen.
3. Colonel Mustard was the only person in the observatory.
4. Professor Plum was not in the library nor the billiard room.
5. The person with the candlestick was in the observatory.

Question: Was Colonel Mustard in the observatory with the candlestick?
(a) Yes; Colonel Mustard was in the observatory with the candlestick
(b) No; Colonel Mustard was not in the observatory with the candlestick
(c) Unknown; there is not enough information to determine whether Colonel Mustard was in the observatory with the candlestick

Solution:
(c) Unknown; there is not enough information to determine whether Colonel Mustard was in the observatory with the candlestick
Although clues 3 and 5 establish that Colonel Mustard was the only person in the observatory and that the person in the observatory had the candlestick, the model fails to combine them into a correct answer of (a) Yes.
However, instead of asking for the answer directly, we can split the task into three pieces:
- First, go through the clues one by one and consider whether the clue is potentially relevant
- Second, combine the relevant clues to reason out the answer to the question
- Third, write the final answer: either (a), (b), or (c)
Use the following clues to answer the following multiple-choice question, using the following procedure:
(1) First, go through the clues one by one and consider whether the clue is potentially relevant
(2) Second, combine the relevant clues to reason out the answer to the question
(3) Third, map the answer to one of the multiple choice answers: either (a), (b), or (c)

Clues:
1. Miss Scarlett was the only person in the lounge.
2. The person with the pipe was in the kitchen.
3. Colonel Mustard was the only person in the observatory.
4. Professor Plum was not in the library nor the billiard room.
5. The person with the candlestick was in the observatory.

Question: Was Colonel Mustard in the observatory with the candlestick?
(a) Yes; Colonel Mustard was in the observatory with the candlestick
(b) No; Colonel Mustard was not in the observatory with the candlestick
(c) Unknown; there is not enough information to determine whether Colonel Mustard was in the observatory with the candlestick

Solution:
(1) First, go through the clues one by one and consider whether the clue is potentially relevant:
Clue 1: Miss Scarlett was the only person in the lounge. This clue is not relevant.
Clue 2: The person with the pipe was in the kitchen. This clue is not relevant.
Clue 3: Colonel Mustard was the only person in the observatory. This clue is relevant.
Clue 4: Professor Plum was not in the library nor the billiard room. This clue is not relevant.
Clue 5: The person with the candlestick was in the observatory. This clue is relevant.

(2) Second, combine the relevant clues to reason out the answer to the question:
Clue 3 and Clue 5 both say that the person with the candlestick was in the observatory. Colonel Mustard was the only person in the observatory, so Colonel Mustard was the person with the candlestick.

(3) Third, write the final answer:
(a) Yes; Colonel Mustard was in the observatory with the candlestick
By giving the model more time and space to think, and guiding it along a reasoning plan, it's able to figure out the correct answer of (a) Yes.
Another benefit of splitting complex instructions into smaller subtasks is that it can help keep the model focused on each subtask.
For example, if we ask gpt-3.5-turbo-instruct to summarize a text in its original language, the model can lapse back into English:
Summarize the text using the original language of the text. The summary should be one sentence long.
Text:
"""
La estadística (la forma femenina del término alemán Statistik, derivado a su vez del italiano statista, "hombre de Estado") es una ciencia que estudia la variabilidad, colección, organización, análisis, interpretación, y presentación de los datos, así como el proceso aleatorio que los genera siguiendo las leyes de la probabilidad. La estadística es una ciencia formal deductiva, con un conocimiento propio, dinámico y en continuo desarrollo obtenido a través del método científico formal. En ocasiones, las ciencias fácticas necesitan utilizar técnicas estadísticas durante su proceso de investigación factual, con el fin de obtener nuevos conocimientos basados en la experimentación y en la observación. En estos casos, la aplicación de la estadística permite el análisis de datos provenientes de una muestra representativa, que busca explicar las correlaciones y dependencias de un fenómeno físico o natural, de ocurrencia en forma aleatoria o condicional.
"""
Summary:
The text explains that statistics is a science that studies the variability, collection, organization, analysis, interpretation, and presentation of data, as well as the random process that generates them following the laws of probability.
However, if we first ask the model to identify the language of the text, and then summarize the text, it becomes more reliable:
First, identify the language of the text. Second, summarize the text using the original language of the text. The summary should be one sentence long.
Text:
"""
La estadística (la forma femenina del término alemán Statistik, derivado a su vez del italiano statista, "hombre de Estado") es una ciencia que estudia la variabilidad, colección, organización, análisis, interpretación, y presentación de los datos, así como el proceso aleatorio que los genera siguiendo las leyes de la probabilidad. La estadística es una ciencia formal deductiva, con un conocimiento propio, dinámico y en continuo desarrollo obtenido a través del método científico formal. En ocasiones, las ciencias fácticas necesitan utilizar técnicas estadísticas durante su proceso de investigación factual, con el fin de obtener nuevos conocimientos basados en la experimentación y en la observación. En estos casos, la aplicación de la estadística permite el análisis de datos provenientes de una muestra representativa, que busca explicar las correlaciones y dependencias de un fenómeno físico o natural, de ocurrencia en forma aleatoria o condicional.
"""
Language:
Spanish

La estadística es una ciencia que estudia la variabilidad, colección, organización, análisis, interpretación, y presentación de los datos, así como el proceso aleatorio que los genera siguiendo las leyes de la probabilidad.
Prompt the model to explain before answering
Another powerful technique for improving the reliability of answers is to prompt the model to gradually reason out the answer rather than jumping immediately to the final answer. By 'thinking aloud' the model can be far more likely to arrive at the correct answer.
Zero-shot
Method
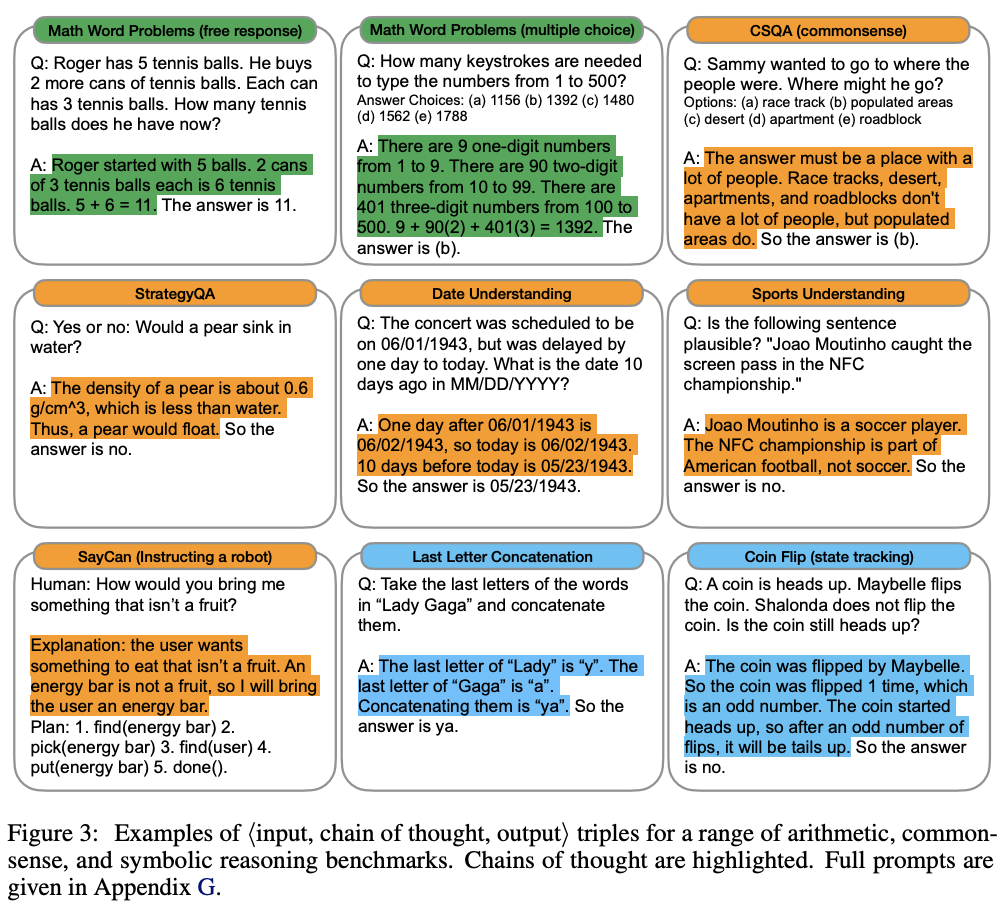
Published by Takeshi Kojima et al. in 2022, the easiest way to prompt a model to reason out the answer is to simply prepend answers with Let's think step by step. Figure 2 illustrates an example:
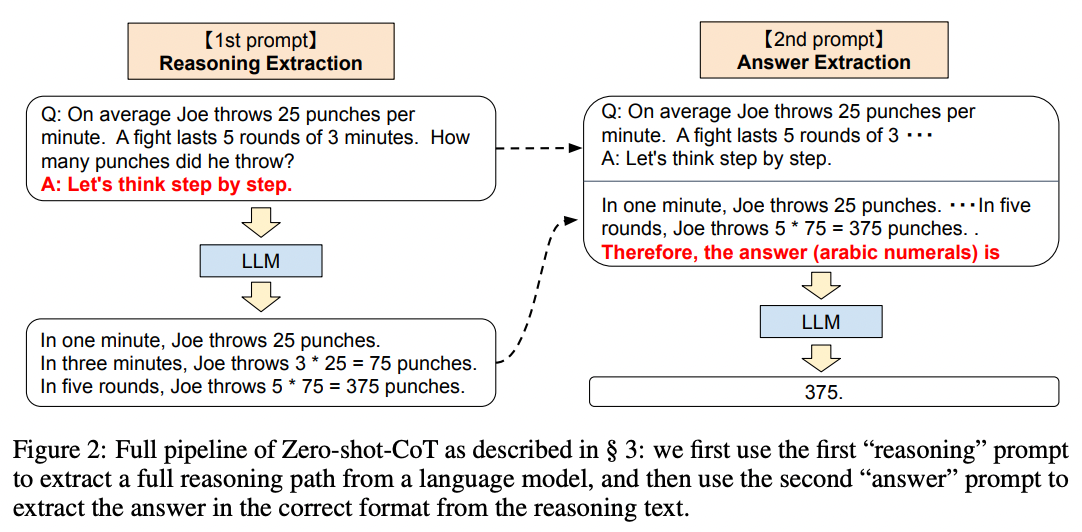
Source: Large Language Models are Zero-Shot Reasoners by Takeshi Kojima et al. (2022).
Results
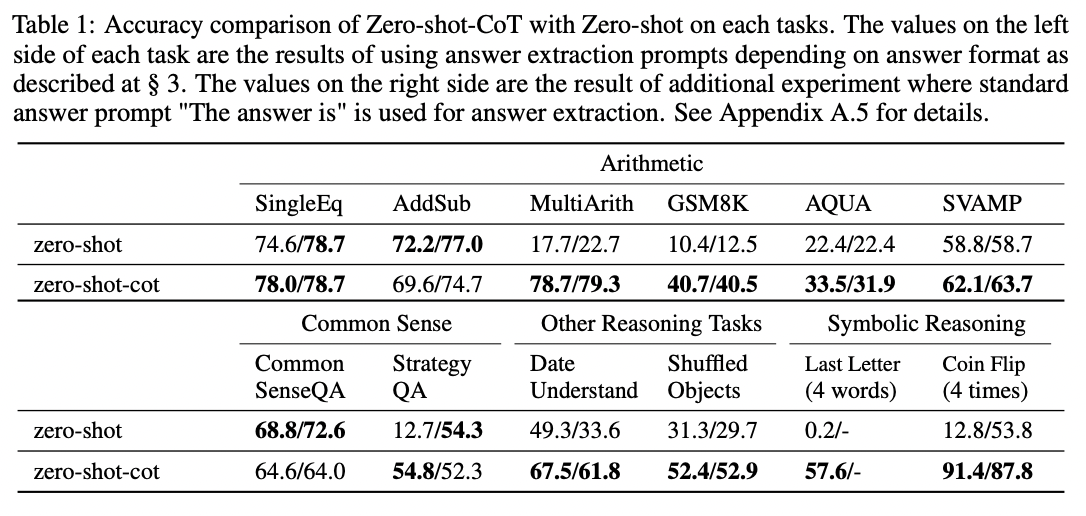
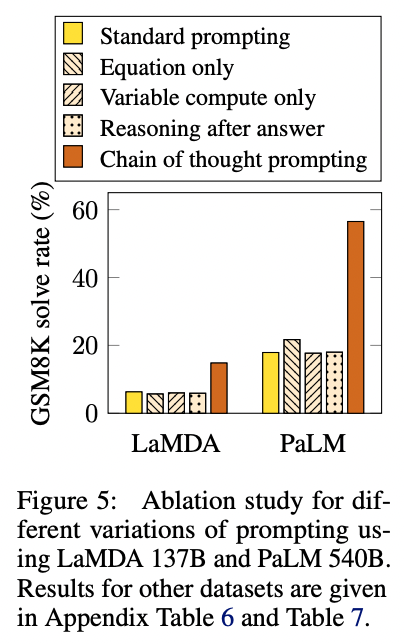
Applying this simple trick to the MultiArith math dataset, the authors found Let's think step by step quadrupled the accuracy, from 18% to 79%!
Source: Large Language Models are Zero-Shot Reasoners by Takeshi Kojima et al. (2022).
Implications
Although the Let's think step by step trick works well on math problems, it's not effective on all tasks. The authors found that it was most helpful for multi-step arithmetic problems, symbolic reasoning problems, strategy problems, and other reasoning problems. It didn't help with simple math problems or common sense questions, and presumably wouldn't help with many other non-reasoning tasks either.
Source: Large Language Models are Zero-Shot Reasoners by Takeshi Kojima et al. (2022).
To learn more, read the full paper.
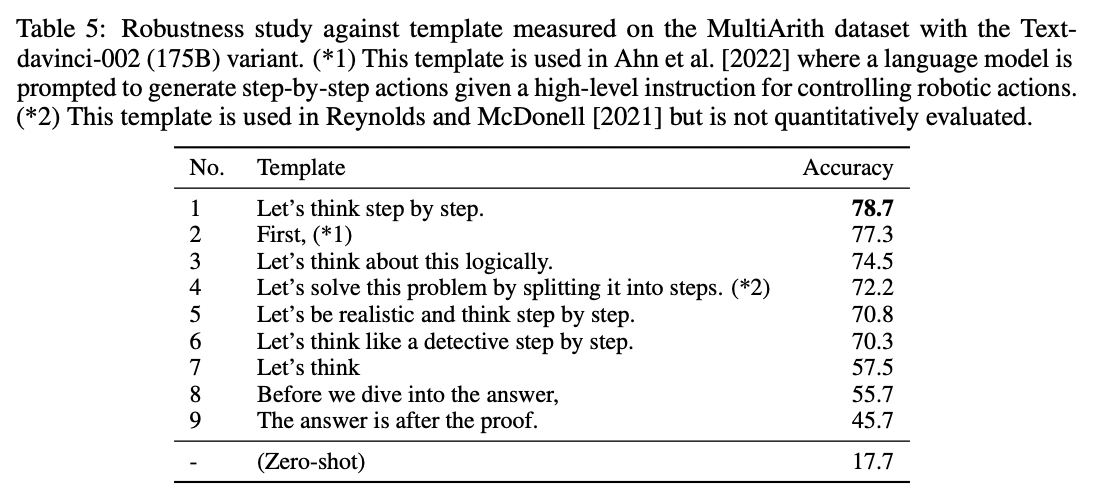
If you apply this technique to your own tasks, don't be afraid to experiment with customizing the instruction. Let's think step by step is rather generic, so you may find better performance with instructions that hew to a stricter format customized to your use case. For example, you can try more structured variants like First, think step by step about why X might be true. Second, think step by step about why Y might be true. Third, think step by step about whether X or Y makes more sense.. And you can even give the model an example format to help keep it on track, e.g.:
Using the IRS guidance below, answer the following questions using this format:
(1) For each criterion, determine whether it is met by the vehicle purchase
- {Criterion} Let's think step by step. {explanation} {yes or no, or if the question does not apply then N/A}.
(2) After considering each criterion in turn, phrase the final answer as "Because of {reasons}, the answer is likely {yes or no}."

IRS guidance:
"""
You may be eligible for a federal tax credit under Section 30D if you purchased a car or truck that meets the following criteria:
- Does the vehicle have at least four wheels?
- Does the vehicle weigh less than 14,000 pounds?
- Does the vehicle draw energy from a battery with at least 4 kilowatt hours that may be recharged from an external source?
- Was the vehicle purchased in a year before 2022?
  - If so, has the manufacturer sold less than 200,000 qualifying vehicles? (Tesla and GM have sold more than 200,000 qualifying vehicles.)
- Was the vehicle purchased in a year after 2022?
  - If so, is the vehicle present in the following list of North American-assembled vehicles? (The only electric vehicles assembled in North America are the Audi Q5, BMW 330e, BMW X5, Chevrolet Bolt EUV, Chevrolet Bolt EV, Chrysler Pacifica PHEV, Ford Escape PHEV, Ford F Series, Ford Mustang MACH E, Ford Transit Van, GMC Hummer Pickup, GMC Hummer SUV, Jeep Grand Cherokee PHEV, Jeep Wrangler PHEV, Lincoln Aviator PHEV, Lincoln Corsair Plug-in, Lucid Air, Nissan Leaf, Rivian EDV, Rivian R1S, Rivian R1T, Tesla Model 3, Tesla Model S, Tesla Model X, Tesla Model Y, Volvo S60, BMW 330e, Bolt EV, Cadillac Lyriq, Mercedes EQS SUV, and Nissan Leaf.)
"""

Question: Can I claim a federal tax credit for my Toyota Prius Prime bought in 2021?

Solution:

(1) For each criterion, determine whether it is met by the vehicle purchase
- Does the vehicle have at least four wheels? Let's think step by step.
 The Toyota Prius Prime has four wheels, so the answer is yes.
- Does the vehicle weigh less than 14,000 pounds? Let's think step by step. The Toyota Prius Prime weighs less than 14,000 pounds, so the answer is yes.
- Does the vehicle draw energy from a battery with at least 4 kilowatt hours that may be recharged from an external source? Let's think step by step. The Toyota Prius Prime has a battery with at least 4 kilowatt hours that may be recharged from an external source, so the answer is yes.
- Was the vehicle purchased in a year before 2022? Let's think step by step. The Toyota Prius Prime was purchased in 2021, which is before 2022, so the answer is yes.
- Was the vehicle purchased in a year after 2022? N/A
- If so, is the vehicle present in the following list of North American-assembled vehicles? N/A

(2) After considering each criterion in turn, phrase the final answer as "Because of {reasons}, the answer is likely {yes or no}."

Because the Toyota Prius Prime meets all of the criteria for a federal tax credit, the answer is likely yes.
Few-shot examples
Method
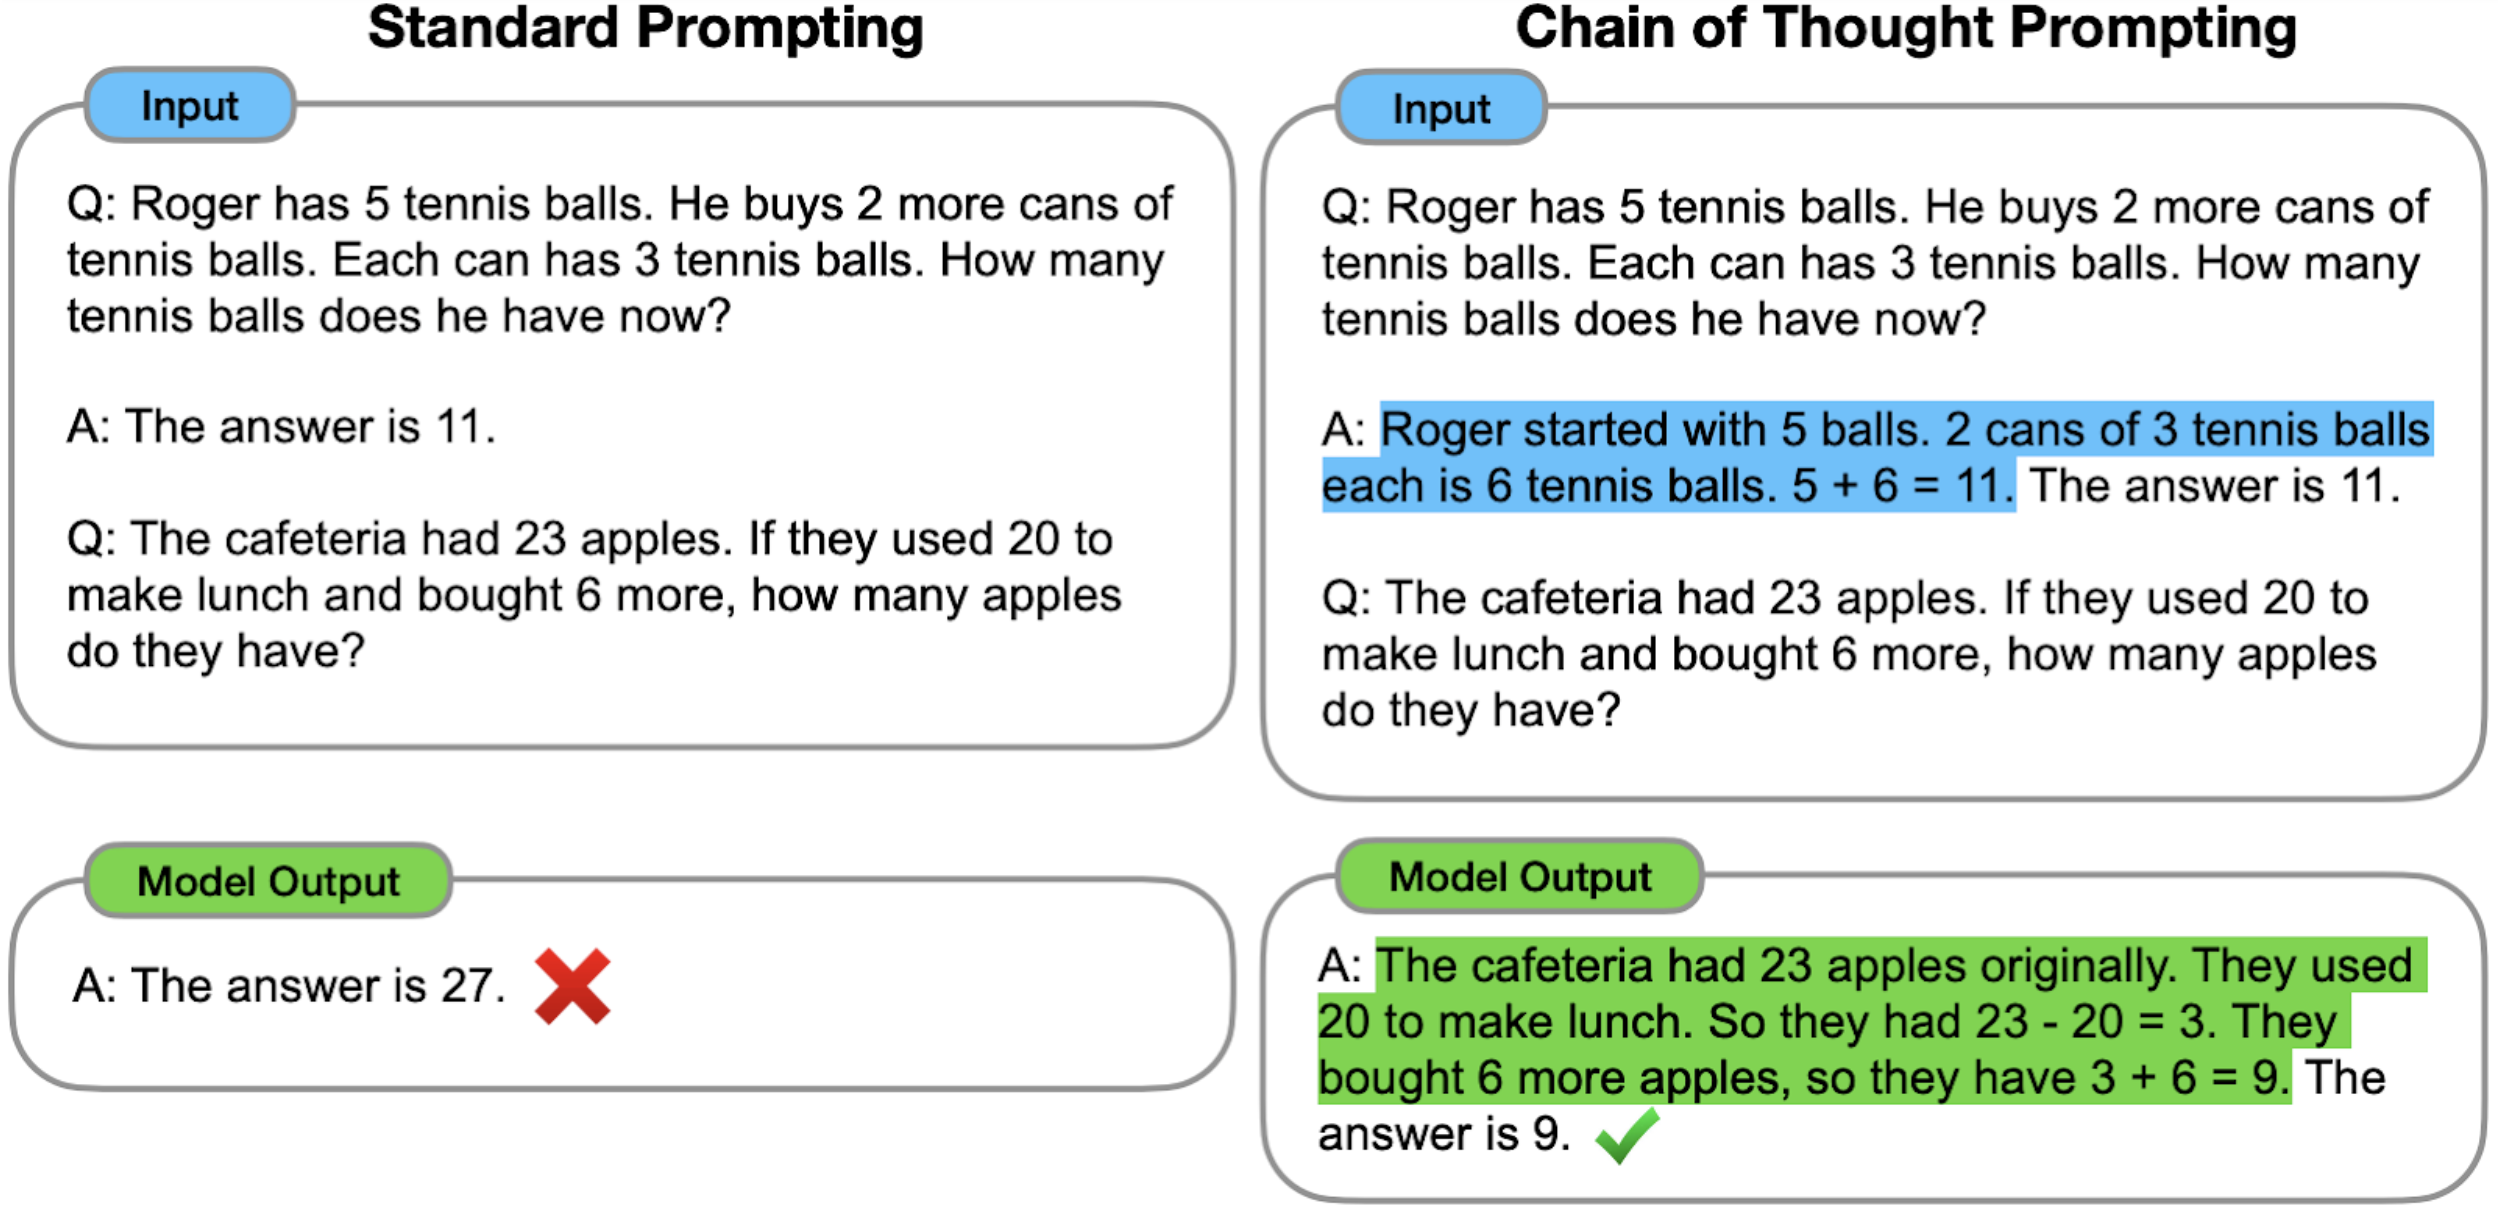
Prompting the model to reason out its answers can be done in many ways. One way is to demonstrate with a few examples ('few-shot'), as studied by Jason Wei and Denny Zhou et al. from Google. Here's an example few-shot chain-of-thought prompt:
More demonstrations of reasoning chains written by human labelers:
Results
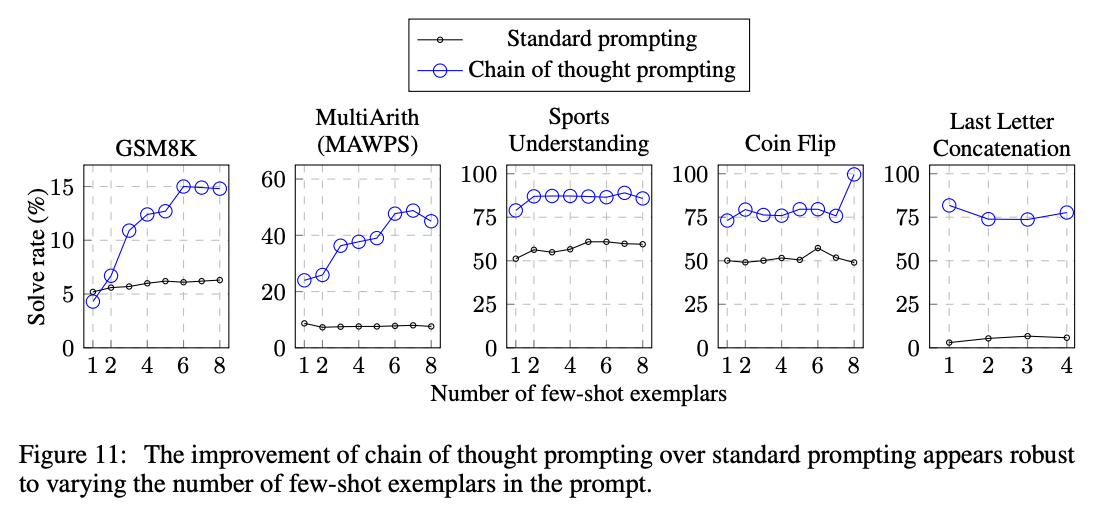
Testing on grade school math problems, the authors found that chain of thought prompting tripled the solve rate, from 18% to 57%.
In addition to math problems, chain of thought prompting also lifted performance on questions related to sports understanding, coin flip tracking, and last letter concatenation. In most cases, not many examples were need to saturate the performance gains (less than 8 or so).
To learn more, read the full paper.
Implications
One advantage of the few-shot example-based approach relative to the Let's think step by step technique is that you can more easily specify the format, length, and style of reasoning that you want the model to perform before landing on its final answer. This can be particularly helpful in cases where the model isn't initially reasoning in the right way or depth.
Fine-tuned
Method
In general, to eke out maximum performance on a task, you'll need to fine-tune a custom model. However, fine-tuning a model using explanations may take thousands of example explanations, which are costly to write.
In 2022, Eric Zelikman and Yuhuai Wu et al. published a clever procedure for using a few-shot prompt to generate a dataset of explanations that could be used to fine-tune a model. The idea is to use a few-shot prompt to generate candidate explanations, and only keep the explanations that produce the correct answer. Then, to get additional explanations for some of the incorrect answers, retry the few-shot prompt but with correct answers given as part of the question. The authors called their procedure STaR (Self-taught Reasoner):
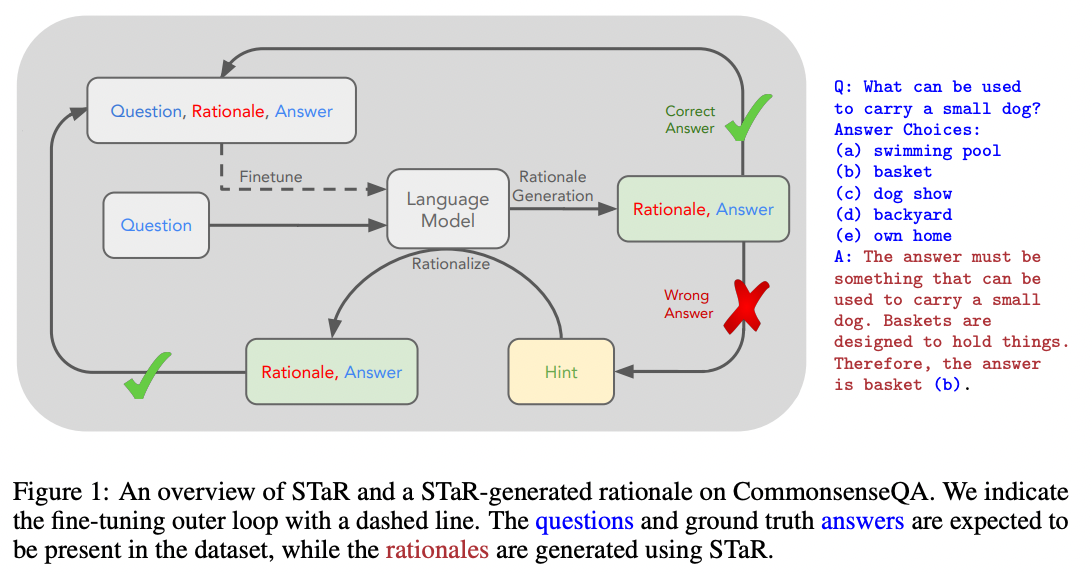
Source: STaR: Bootstrapping Reasoning With Reasoning by Eric Zelikman and Yujuai Wu et al. (2022)
With this technique, you can combine the benefits of fine-tuning with the benefits of chain-of-thought prompting without needing to write thousands of example explanations.
Results
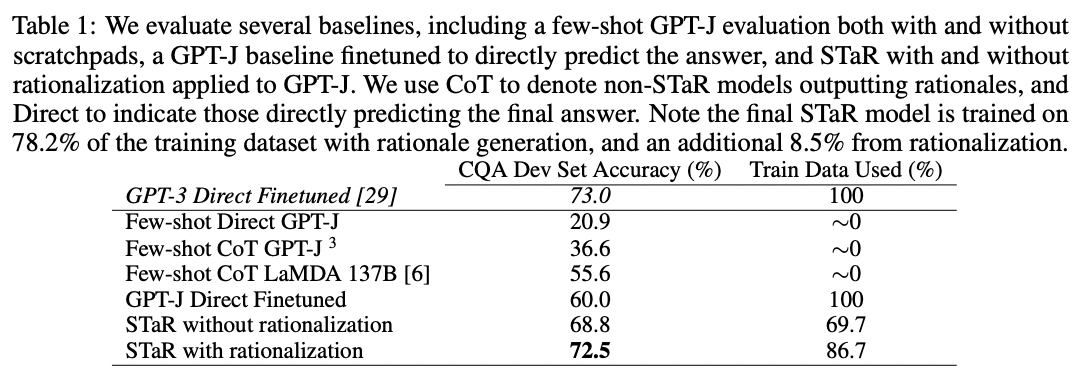
When the authors applied this technique to a Common Sense Q&A dataset, they found that STaR outperformed both chain-of-thought prompting alone (73% > 37%) and fine-tuning alone (73% > 60%):
Source: STaR: Bootstrapping Reasoning With Reasoning by Eric Zelikman and Yujuai Wu et al. (2022)
To learn more, read the full paper.
Implications
Using a few-shot prompt to extend or modify a fine-tuning dataset is an idea that can be generalized beyond explanation writing. For example, if you have large quantities of unstructured text that you want to train on, you may find opportunities to use a prompt to extract a structured dataset from your unstructured text, and then fine-tune a custom model on that structured dataset.
Extensions to chain-of-thought prompting
A number of extensions of chain-of-thought prompting have been published as well.
Selection-inference prompting
Method
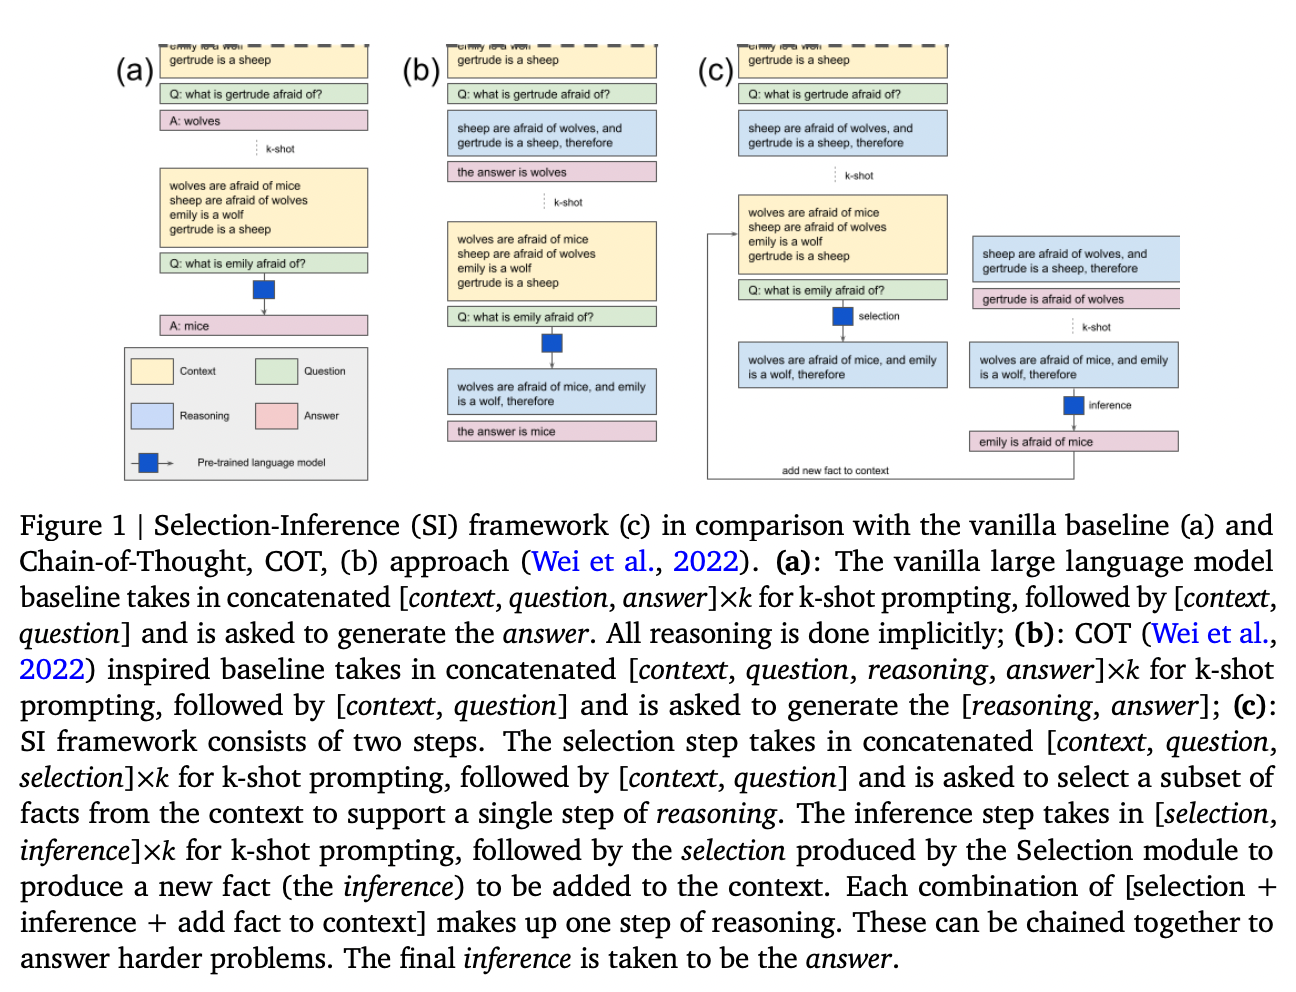
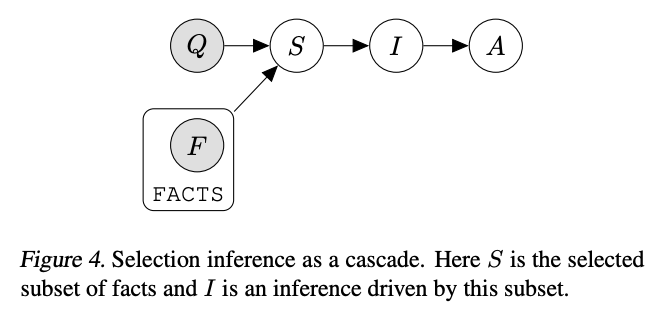
Published by Antonia Creswell et al., one extension of the chain-of-thought technique is to split the single prompt for generating explanations and answers into smaller parts. First, a prompt selects a relevant subset of facts from the text ('selection prompt'). Then, a second prompt infers a conclusion from the selected facts ('inference prompt'). These prompts are then alternated in a loop to generate multiple steps of reasoning and eventually land on a final answer. The authors illustrate the idea in the following figure:
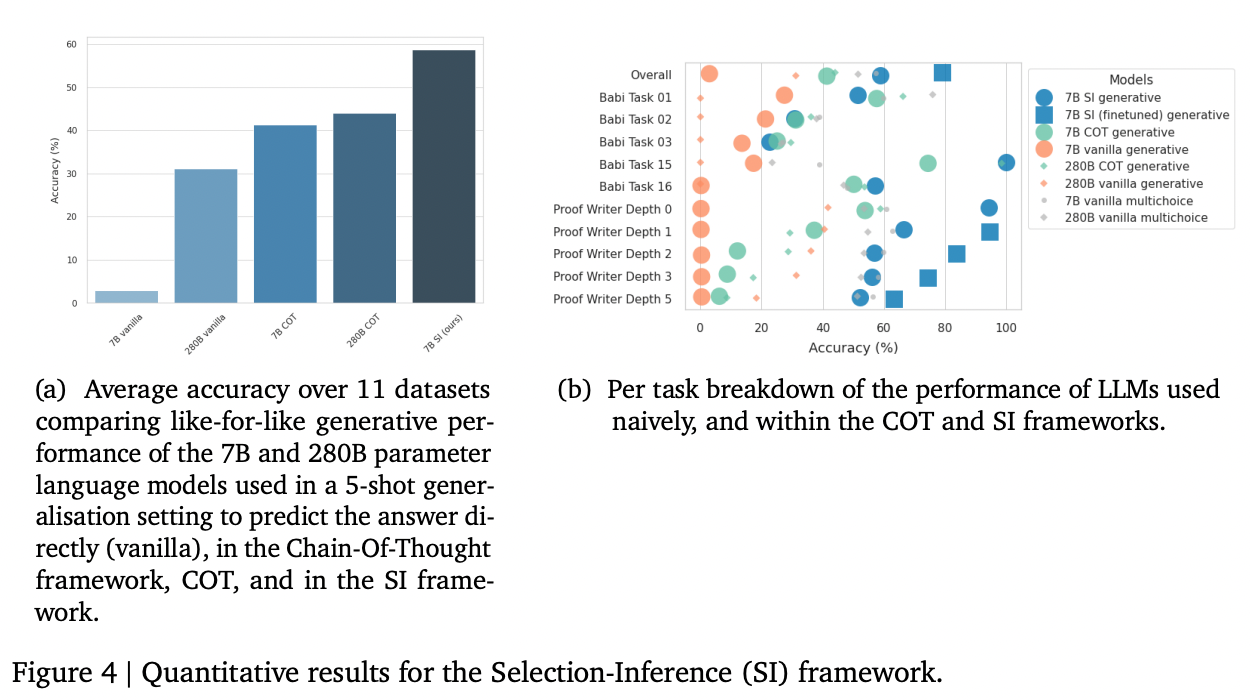
Results
When applied to a 7B-parameter model, the authors found that selection-inference prompting substantially improved performance relative to chain-of-thought prompting on the bAbi and Proof Writer benchmark tasks (both of which require longer sequences of reasoning steps). The best performance they achieved combined both selection-inference prompting with fine-tuning.
Implications
Although the gains on these benchmarks were large, these benchmarks were specifically chosen because they required longer sequences of reasoning. On problems that don't require reasoning with many steps, the gains are likely smaller.
The results highlight a couple of general lessons for working with large language models. One, splitting up complex tasks into smaller tasks is a great way to improve reliability and performance; the more atomic the task, the less room there is for the model to err. Two, getting maximum performance often means combining fine-tuning with whatever approach you've chosen.
To learn more, read the full paper.
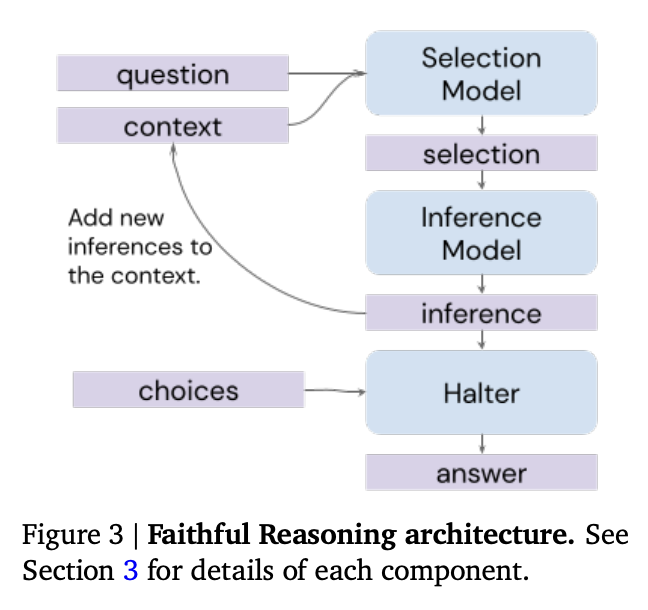
Faithful reasoning architecture
A few months after publishing the selection-inference prompting technique, the authors extended the technique in a follow-up paper, with ideas for:
- figuring out when the selection-inference cycle should stop or continue
- adding a value function to help search over multiple reasoning paths
- reducing hallucination of fake facts by fine-tuning a model to reason about sentence labels (e.g., sen1) rather than writing out the sentences themselves
Method
In the original selection-inference technique, specialized 'selection' and 'inference' prompts are alternated to select facts and make inferences from those facts, combining to generate a sequence of reasoning steps.
The authors extend this technique with two additional components.
First, the authors add a 'halter' model that, after each inference step, is asked whether the inferences thus far are sufficient to answer the question. If yes, then the model generates a final answer.
The halter models brings a couple of advantages:
- it can tell the selection-inference process to stop or keep going, as necessary.
- if the process never halts, you'll get no answer, which is often preferable to a hallucinated guess
Source: Faithful Reasoning Using Large Language Models by Antonia Creswell et al. (2022)
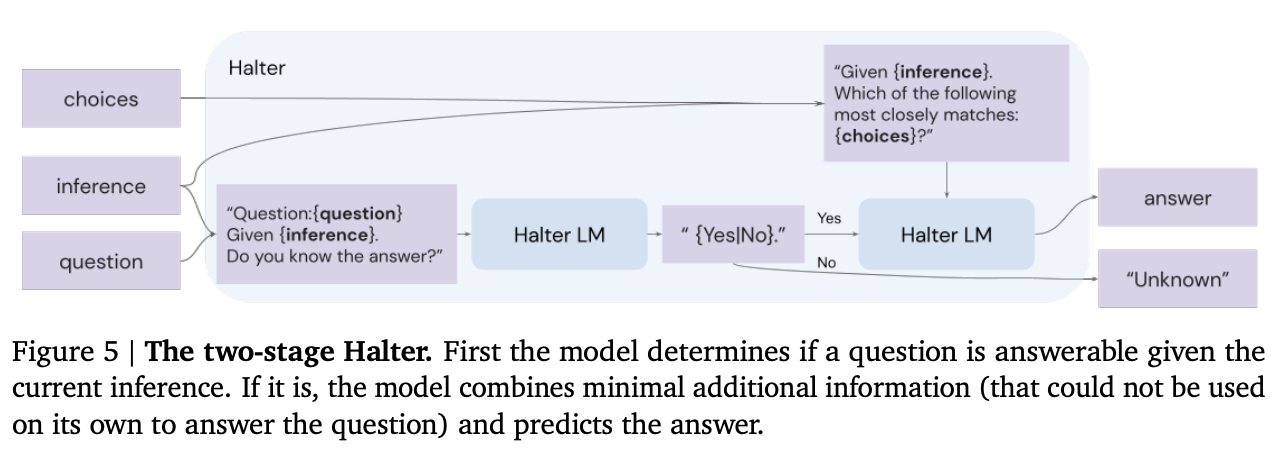
Source: Faithful Reasoning Using Large Language Models by Antonia Creswell et al. (2022)
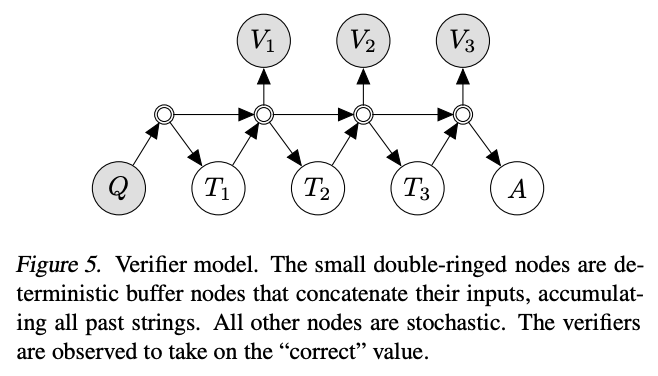
Second, the authors add a value function, which is used to assess the quality of reasoning steps and search over multiple reasoning trajectories. This echoes a common theme for increasing reliability; instead of generating a single answer from the model, generate a set of answers and then use some type of value function / discriminator / verifier model to pick the best one.
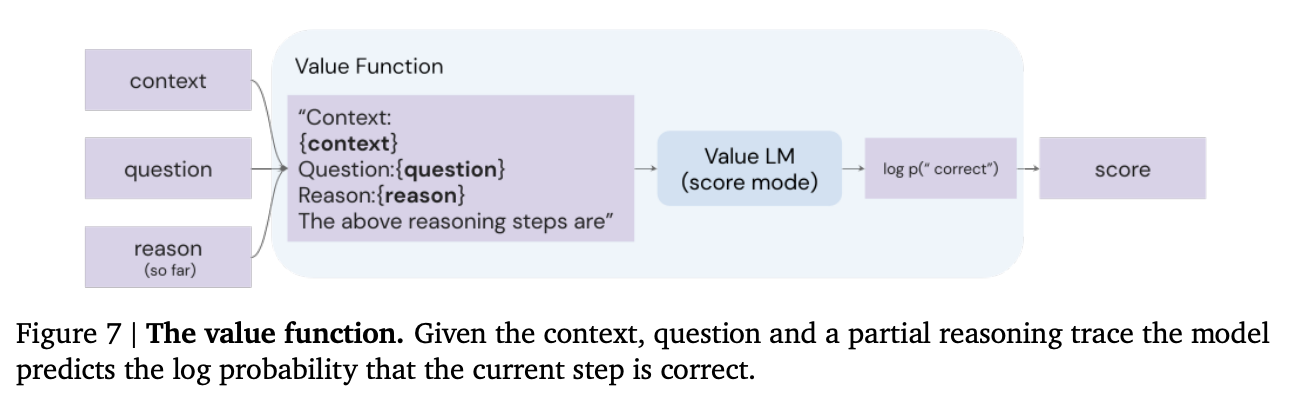
Source: Faithful Reasoning Using Large Language Models by Antonia Creswell et al. (2022)
In addition to these two extensions, the authors also use a trick to reduce hallucination of fake facts. Rather than asking the model to write out factual sentences, they fine-tune a model to work with sentence labels (e.g., sen1) instead. This helps prevent the model from hallucinating fake facts not mentioned in the prompt context.
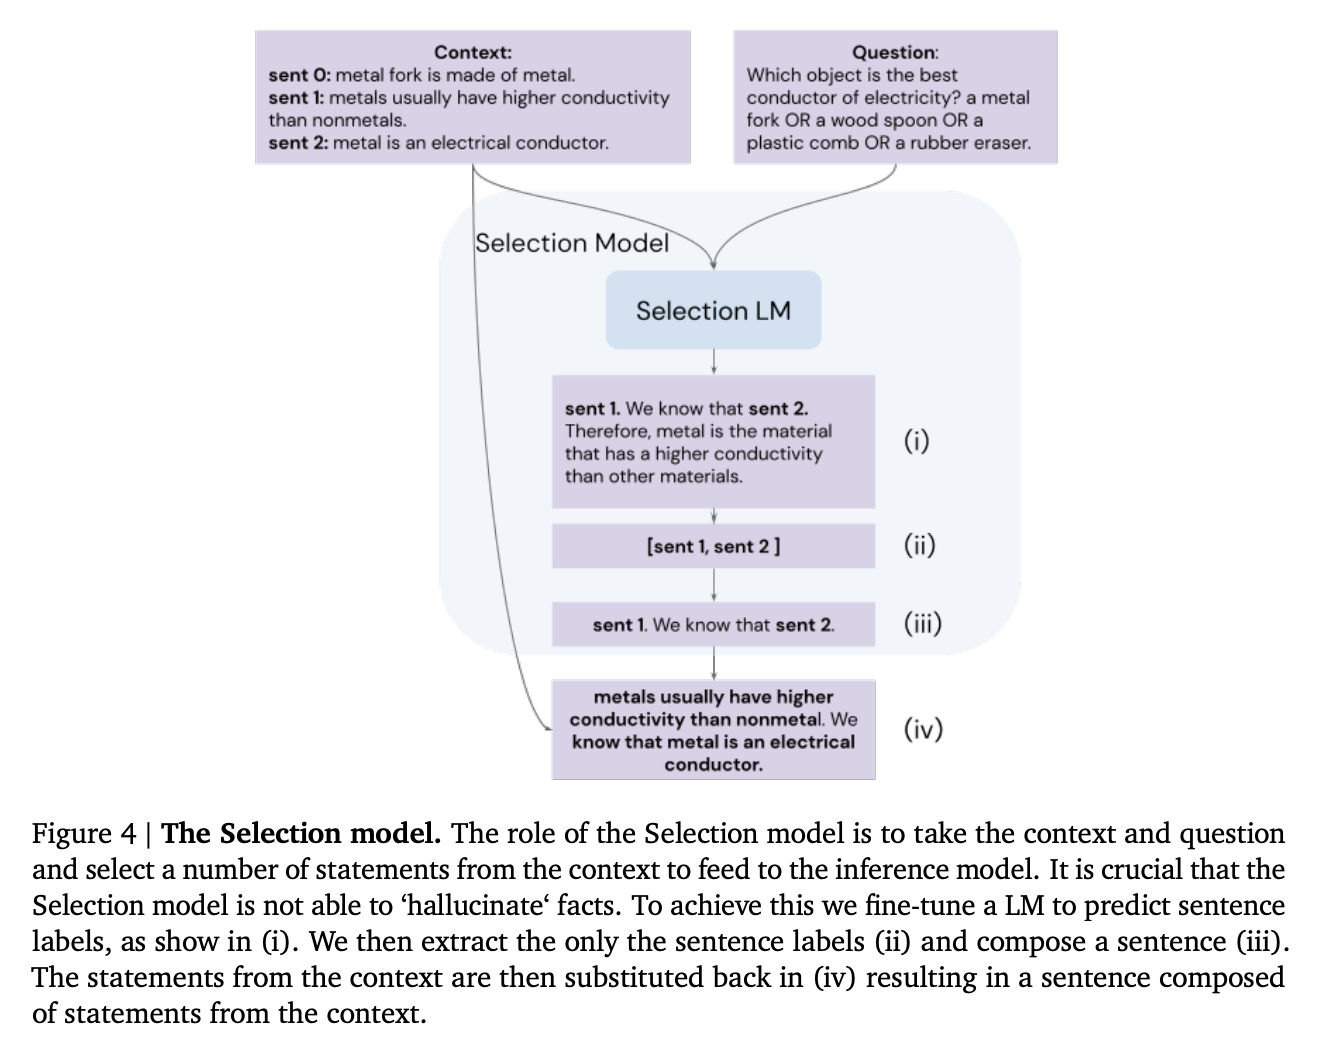
Source: Faithful Reasoning Using Large Language Models by Antonia Creswell et al. (2022)
Results
The authors evaluated their technique on two benchmarks: the ProofWriter task (not shown) and EntailmentBankQA (shown). The technique increased accuracy substantially, especially on harder reasoning problems.
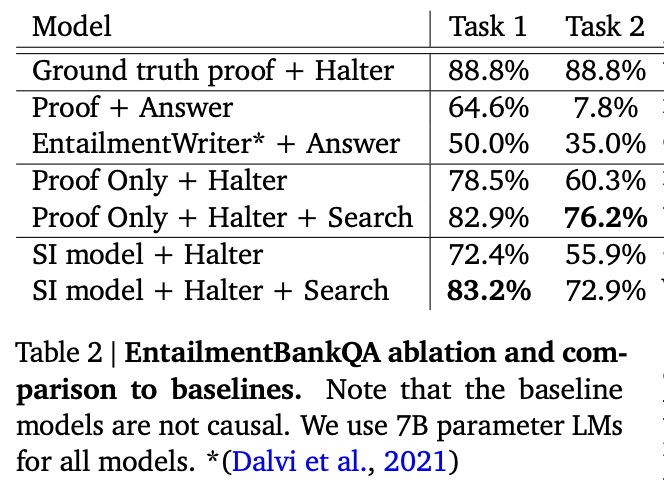
Source: Faithful Reasoning Using Large Language Models by Antonia Creswell et al. (2022)](https://arxiv.org/abs/2208.14271)
In addition, their sentence label manipulation trick essentially eliminated hallucination!
Source: Faithful Reasoning Using Large Language Models by Antonia Creswell et al. (2022)](https://arxiv.org/abs/2208.14271)
Implications
This paper illustrates a number of helpful lessons for improving the reliability of large language models:
- Split complex tasks into smaller, more reliable subtasks
- Generate your answer in a step-by-step fashion, evaluating it along the way
- Generate many possible answers and use another model or function to pick the ones that look best
- Reduce hallucination by constraining what the model can say (e.g., by using sentence labels instead of sentences)
- Maximize performance of models by fine-tuning them on specialized tasks
To learn more, read the full paper.
Least-to-most prompting
In addition to doing poorly on long reasoning chains (where selection-inference shines), chain-of-thought prompting can especially struggle when the examples are short but the task is long.
Method
Least-to-most prompting is another technique that splits up reasoning tasks into smaller, more reliable subtasks. The idea is to elicit a subtask from the model by prompting it with something like To solve {question}, we need to first solve: ". Then, with that subtask in hand, the model can generate a solution. The solution is appended to the original question and the process is repeated until a final answer is produced.
Results
When applied to benchmarks involving long reasoning chains using code-davinci-002 (which is optimized for code but can still understand text), the authors measured gains as large as 16% -> 99.7%!
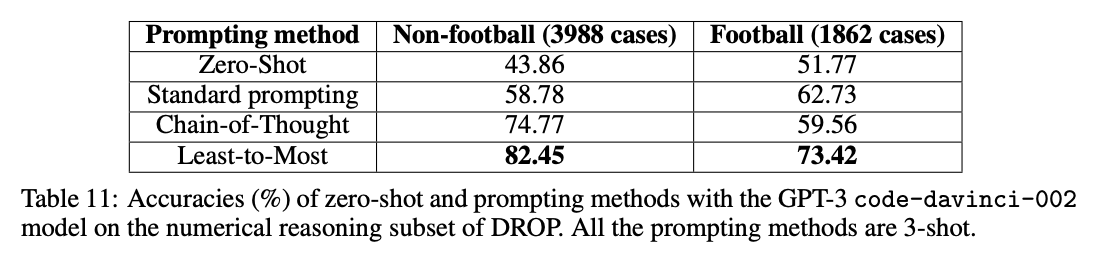
Implications
Although the above gains from least-to-most prompting are impressive, they are measured on a very narrow set of tasks that require long reasoning chains.
Still, they illustrate a common theme: increase reliability by (a) breaking complex tasks into smaller subtasks and (b) giving the model more time and space to work out the answer.
To learn more, read the full paper.
Related ideas
Maieutic prompting
Method
In contrast to the previous techniques, which try to maximize the likelihood of correct answers, another approach is to use GPT-3 to generate a tree of possible explanations (both correct and incorrect), and then analyze their relationships to guess at which set is correct. This technique was coined maieutic prompting by Jaehun Jung et al. in May 2022 (maieutic means relating to the Socratic method of asking questions to elicit ideas).
The method is complicated, and works as follows:
- First, build a maieutic tree, where each node is a statement that could be true or false:
- Start with a multiple-choice question or true/false statement (e.g.
War cannot have a tie) - For each possible answer to the question, use the model to generate a corresponding explanation (with a prompt like
War cannot have a tie? True, because) - Then, prompt the model with the question and the generated explanation, and ask it to produce the answer. If reversing the explanation (with a prefix like
It is wrong to say that {explanation}) reverses the answer, then the explanation is considered 'logically integral.' - If an explanation is not logically integral, then repeat the above process recursively, with each explanation turned into a True or False question, and generate more explanations for each new question.
- After all of the recursive explaining is done, you end up with a tree of explanations, where each leaf on the tree has the property that reversing the explanation reverses the model's answer.
- Start with a multiple-choice question or true/false statement (e.g.
- Second, convert the tree into a graph of relations:
- For each node in the tree, calculate the model's relative belief in each node (inferred from the probability of getting an answer of
Trueto given an explanation) - For each pair of nodes in the tree, use the model to identify whether they are entailed (implied) or contradicted
- For each node in the tree, calculate the model's relative belief in each node (inferred from the probability of getting an answer of
- Third, find the most consistent set of beliefs and take those to be true:
- Specifically, using the strength of belief in each node and the logical relationships between them, formulate the problem as a weighted maximum satisfiability problem (MAX-SAT)
- Use a solver to the find the most self-consistent set of beliefs, and take those as true

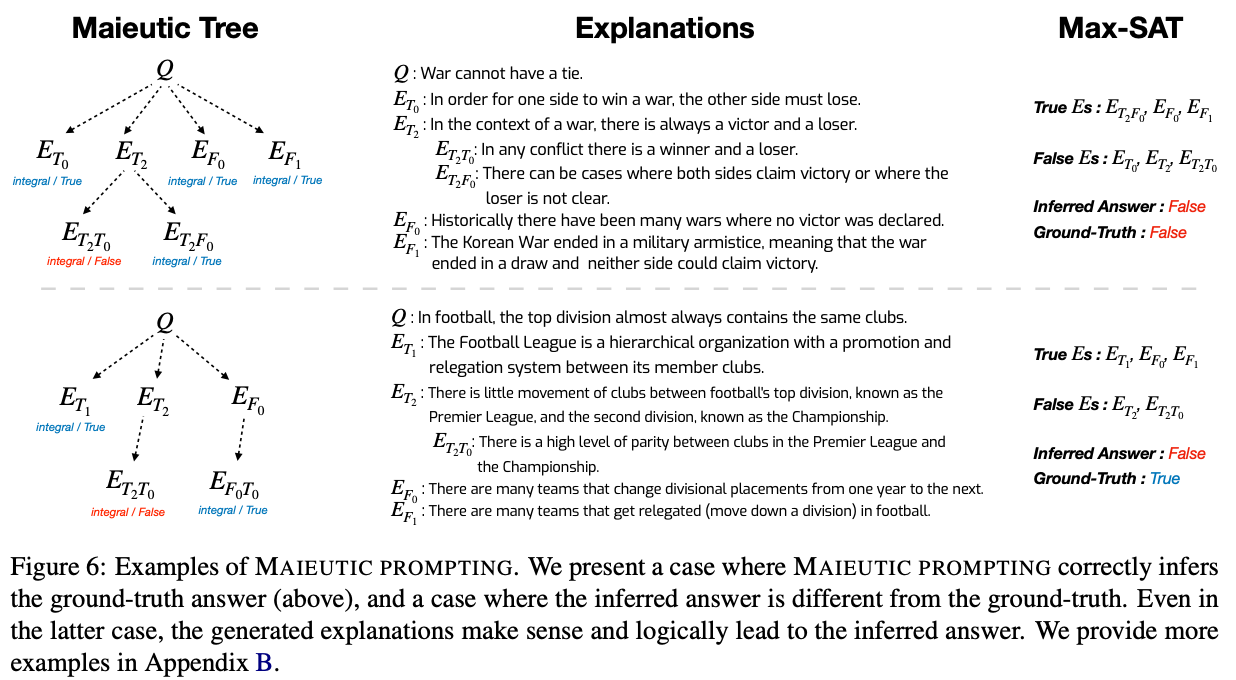
Results
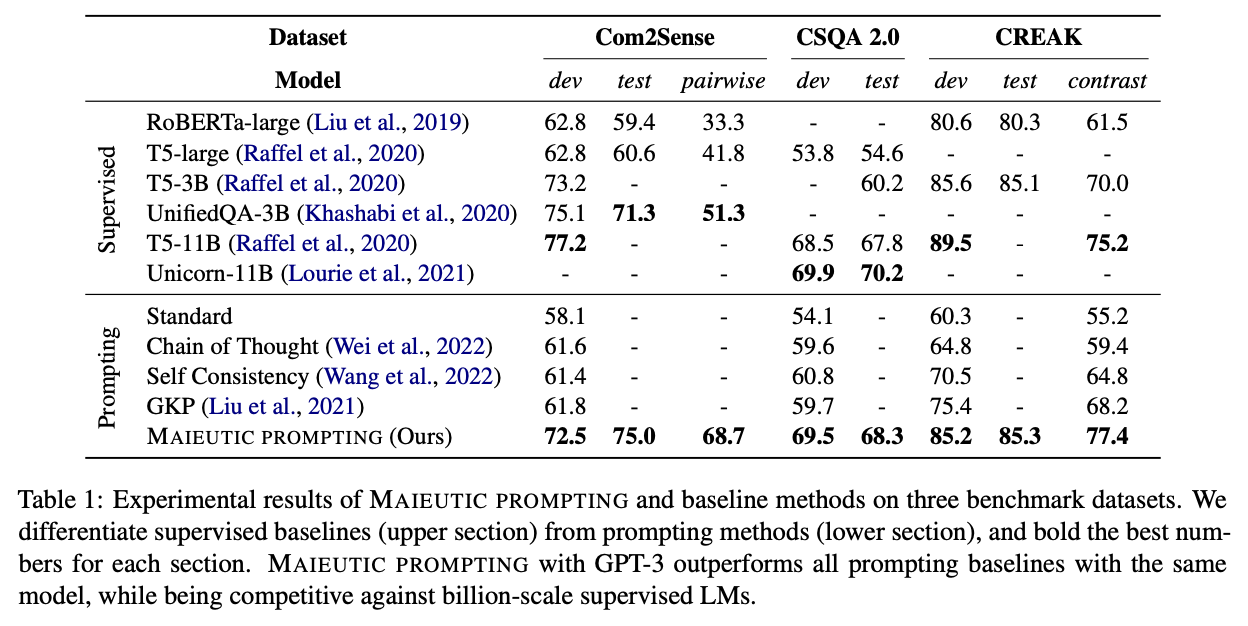
Implications
Beyond the complexity, one limitation of this method is that it appears to only apply to questions that can be posed as multiple-choice.
To learn more, read the full paper.
Extensions
Self-consistency
Method
For tasks with a discrete set of answers, one simple way to improve reliability is to sample multiple explanations & answers from the model (using a positive temperature) and then pick the final answer that appears most often.
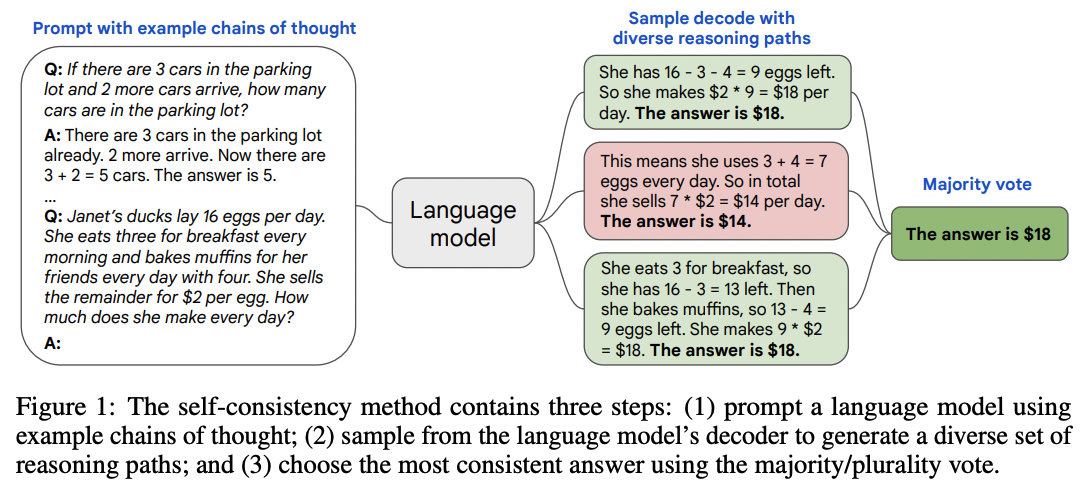
Results
This technique lifted accuracies by anywhere from 1 to 24 percentage points on a suite of math and reasoning benchmarks. (Plotted below are results from Google's LaMDA model; using Google's larger PaLM model, the baselines were higher but the gains were a bit smaller.)
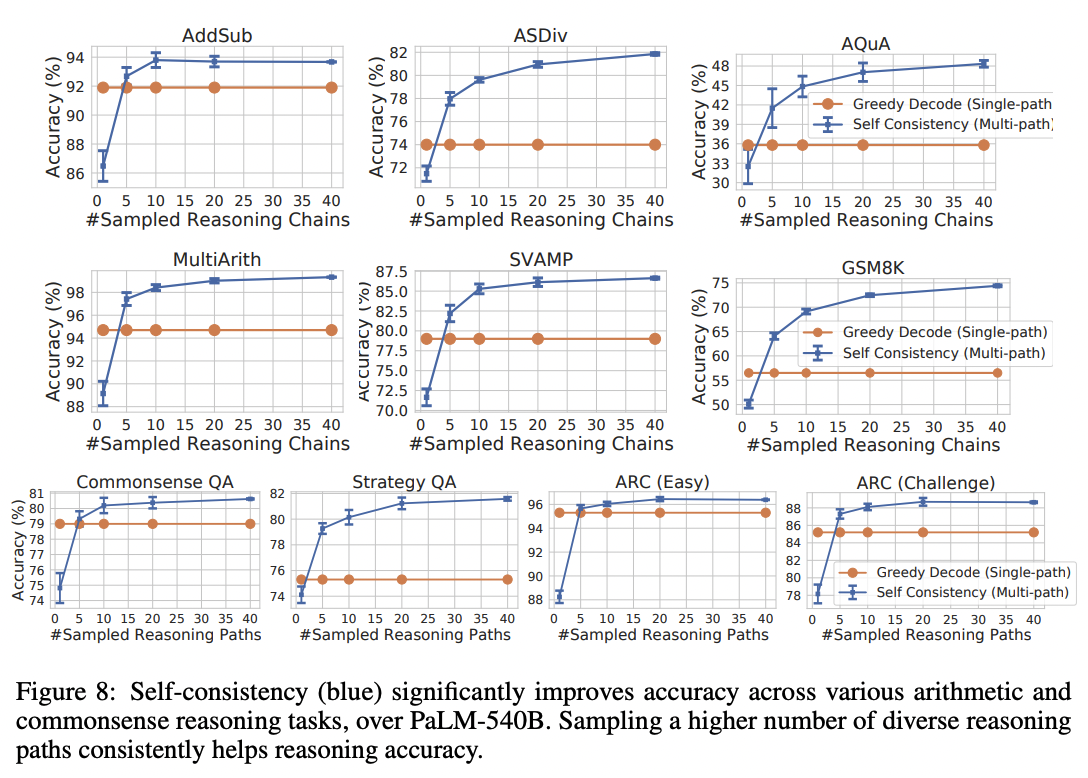
Implications
Although this technique is simple to implement, it can be costly. Generating a set of 10 answers will increase your costs by 10x.
Also, as with many of these techniques, it applies only to tasks with a limited set of answers. For open-ended tasks where each answer is unique (such as writing a poem), it's not obvious what it would mean to pick the most common answer.
Lastly, this technique ought to be most beneficial when there are multiple paths or phrasings to reach an answer; if there's only one path, then the technique may not help at all. An extreme example: If the task was to generate a single token answer, then taking the most common token from 100 generations would be no different than taking the token with the highest logprobs (which you can get with a single generation at temperature=0).
Verifiers
Another key technique for improving task performance is to train a verifier or discriminator model to evaluate the outputs of the main generative model. If the discriminator rejects the output, then you can resample the generative model until you get an acceptable output. In many cases, it's easier to judge an answer than it is to create an answer, which helps explain the power of this method.
Method
In 2021, OpenAI researchers applied this technique to grade school math problems, using the following procedure:
- First, they fine-tuned a model on questions and solutions
- For each problem in the training set, they generated 100 solutions
- Each of those 100 solutions was automatically labeled as either correct or incorrect, based on whether the final answer was correct
- Using those solutions, with some labeled correct and some labeled incorrect, they fine-tuned a verifier model to classify whether a question and candidate solution was correct or incorrect
- Finally, at test time, the generative model creates 100 solutions to each problem, and the one with the highest score according to the verifier model is picked as the final answer
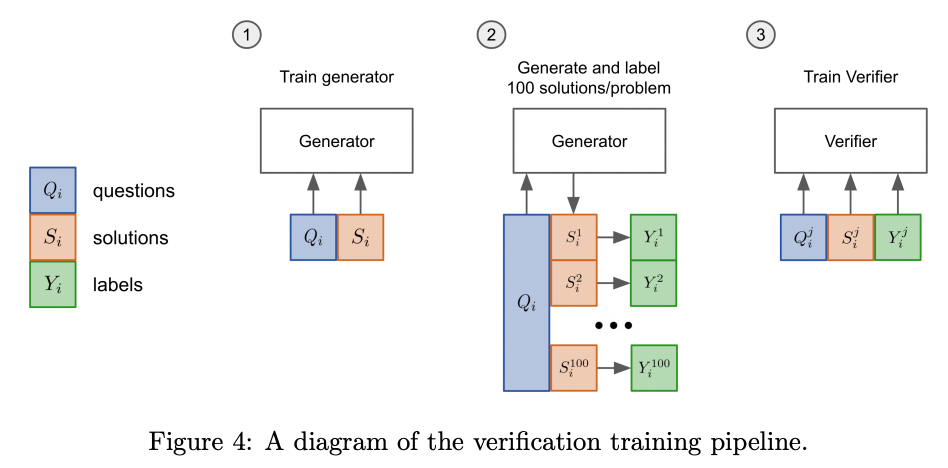
Source: Training Verifiers to Solve Math Word Problems by Karl Cobbe et al. (2021)
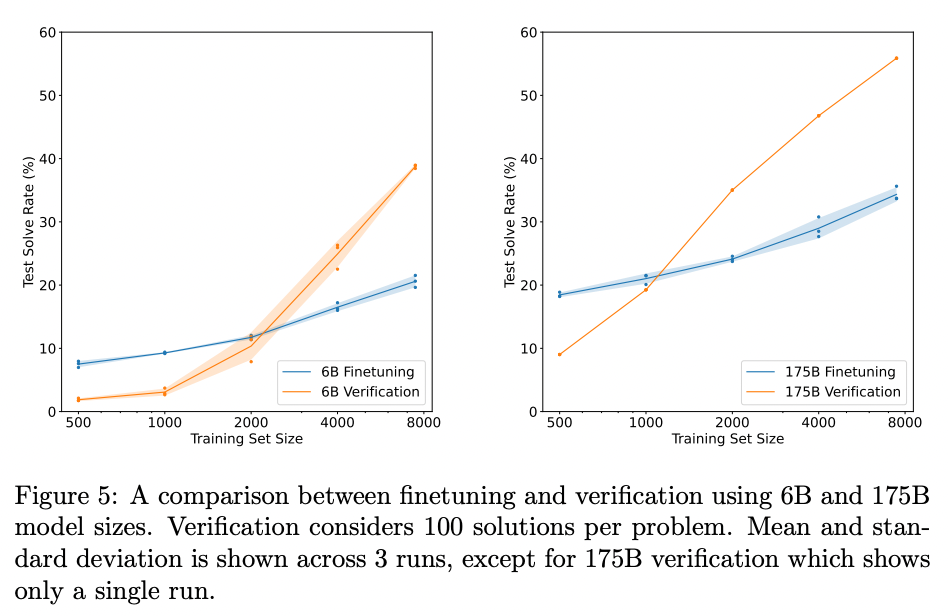
Results
With a 175B GPT-3 model and 8,000 training examples, this technique substantially lifted grade school math accuracy from ~33% to ~55%.
Source: Training Verifiers to Solve Math Word Problems by Karl Cobbe et al. (2021)
Implications
Similar to the self-consistency technique, this method can get expensive, as generating, say, 100 solutions per task will increase your costs by roughly ~100x.
Theories of reliability
Although the techniques above vary in their approach, they all share the goal of improving reliability on complex tasks. Mainly they do this by:
- decomposing unreliable operations into smaller, more reliable operations (e.g., selection-inference prompting)
- using multiple steps or multiple relationships to make the system's reliability greater than any individual component (e.g., maieutic prompting)
Probabilistic graphical models
This paradigm of trying to build a reliable system out of less reliable components is reminiscent of probabilistic programming, and many of the analysis techniques of that field can be applied to this one.
In the paper Language Model Cascades, David Dohan et al. interpret the above techniques in the paradigm of probabilistic graphical models:
Chain of thought prompting
Source: Language Model Cascades by David Dohan et al. (2022)
Fine-tuned chain of thought prompting / Self-taught reasoner

Source: Language Model Cascades by David Dohan et al. (2022)
Selection-inference prompting
Source: Language Model Cascades by David Dohan et al. (2022)
Verifiers
Source: Language Model Cascades by David Dohan et al. (2022)
Implications
Although formulating these techniques as probabilistic graphical models may not be immediately useful for solving any particular problem, the framework may be helpful in selecting, combining, and discovering new techniques.
Closing thoughts
Research into large language models is very active and evolving rapidly. Not only do researchers continue to improve the models, they also continue to improve our understanding of how to best employ the models. To underscore the pace of these developments, note that all of the papers shared above were published within the past 12 months (as I write in Sep 2022).
In the future, expect better models and better techniques to be published. Even if the specific techniques here are eclipsed by future best practices, the general principles behind them will likely remain a key part of any expert user's toolkit.
Bibliography
| Lesson | Paper | Date |
|---|---|---|
| Break complex tasks into simpler subtasks (and consider exposing the intermediate outputs to users) | AI Chains: Transparent and Controllable Human-AI Interaction by Chaining Large Language Model Prompts | 2021 Oct |
| You can improve output by generating many candidates, and then picking the one that looks best | Training Verifiers to Solve Math Word Problems | 2021 Oct |
| On reasoning tasks, models do better when they reason step-by-step before answering | Chain of Thought Prompting Elicits Reasoning in Large Language Models | 2022 Jan |
| You can improve step-by-step reasoning by generating many explanation-answer outputs, and picking the most popular answer | Self-Consistency Improves Chain of Thought Reasoning in Language Models | 2022 Mar |
| If you want to fine-tune a step-by-step reasoner, you can do it with multiple-choice question & answer data alone | STaR: Bootstrapping Reasoning With Reasoning | 2022 Mar |
| The step-by-step reasoning method works great even with zero examples | Large Language Models are Zero-Shot Reasoners | 2022 May |
| You can do better than step-by-step reasoning by alternating a ‘selection’ prompt and an ‘inference’ prompt | Selection-Inference: Exploiting Large Language Models for Interpretable Logical Reasoning | 2022 May |
| On long reasoning problems, you can improve step-by-step reasoning by splitting the problem into pieces to solve incrementally | Least-to-most Prompting Enables Complex Reasoning in Large Language Models | 2022 May |
| You can have the model analyze both good and bogus explanations to figure out which set of explanations are most consistent | Maieutic Prompting: Logically Consistent Reasoning with Recursive Explanations | 2022 May |
| You can think about these techniques in terms of probabilistic programming, where systems comprise unreliable components | Language Model Cascades | 2022 Jul |
| You can eliminate hallucination with sentence label manipulation, and you can reduce wrong answers with a 'halter' prompt | Faithful Reasoning Using Large Language Models | 2022 Aug |
Text comparison examples
The OpenAI API embeddings endpoint can be used to measure relatedness or similarity between pieces of text.
By leveraging GPT-3's understanding of text, these embeddings achieved state-of-the-art results on benchmarks in unsupervised learning and transfer learning settings.
Embeddings can be used for semantic search, recommendations, cluster analysis, near-duplicate detection, and more.
For more information, read OpenAI's blog post announcements:
Semantic search
Embeddings can be used for search either by themselves or as a feature in a larger system.
The simplest way to use embeddings for search is as follows:
- Before the search (precompute):
- At the time of the search (live compute):
- Embed the search query
- Find the closest embeddings in your database
- Return the top results
An example of how to use embeddings for search is shown in Semantic_text_search_using_embeddings.ipynb.
In more advanced search systems, the cosine similarity of embeddings can be used as one feature among many in ranking search results.
Question answering
The best way to get reliably honest answers from GPT-3 is to give it source documents in which it can locate correct answers. Using the semantic search procedure above, you can cheaply search through a corpus of documents for relevant information and then give that information to GPT-3 via the prompt to answer a question. We demonstrate this in Question_answering_using_embeddings.ipynb.
Recommendations
Recommendations are quite similar to search, except that instead of a free-form text query, the inputs are items in a set.
An example of how to use embeddings for recommendations is shown in Recommendation_using_embeddings.ipynb.
Similar to search, these cosine similarity scores can either be used on their own to rank items or as features in larger ranking algorithms.
Customizing Embeddings
Although OpenAI's embedding model weights cannot be fine-tuned, you can nevertheless use training data to customize embeddings to your application.
In Customizing_embeddings.ipynb, we provide an example method for customizing your embeddings using training data. The idea of the method is to train a custom matrix to multiply embedding vectors by in order to get new customized embeddings. With good training data, this custom matrix will help emphasize the features relevant to your training labels. You can equivalently consider the matrix multiplication as (a) a modification of the embeddings or (b) a modification of the distance function used to measure the distances between embeddings.
MCP for Deep Research
This is a minimal example of a Deep Research style MCP server for searching and fetching files from the OpenAI file storage service.
For a reference of how to call this service from the Responses API, with Deep Research see this cookbook. To see how to call the MCP server with the Agents SDK, checkout this cookbook!
The Deep Research agent relies specifically on Search and Fetch tools. Search should look through your object store for a set of specfic, top-k IDs. Fetch, is a tool that takes objectIds as arguments and pulls back the relevant resources.
Set up & run
Store your internal file(s) in OpenAI Vector Storage
Python setup:
python3 -m venv env
source env/bin/activate
pip install -r requirements.txt
Run the server:
python main.py
The server will start on http://0.0.0.0:8000/sse/ using SSE transport. If you want to reach the server from the public internet, there are a variety of ways to do that including with ngrok:
brew install ngrok
ngrok config add-authtoken <your_token>
ngrok http 8000
You should now be able to reach your local server from your client.
Files
main.py: Main server code
Example Flow diagram for MCP Server

Example request
# system_message includes reference to internal file lookups for MCP.
system_message = """
You are a professional researcher preparing a structured, data-driven report on behalf of a global health economics team. Your task is to analyze the health question the user poses.

Do:
- Focus on data-rich insights: include specific figures, trends, statistics, and measurable outcomes (e.g., reduction in hospitalization costs, market size, pricing trends, payer adoption).
- When appropriate, summarize data in a way that could be turned into charts or tables, and call this out in the response (e.g., "this would work well as a bar chart comparing per-patient costs across regions").
- Prioritize reliable, up-to-date sources: peer-reviewed research, health organizations (e.g., WHO, CDC), regulatory agencies, or pharmaceutical earnings reports.
- Include an internal file lookup tool to retrieve information from our own internal data sources. If you've already retrieved a file, do not call fetch again for that same file. Prioritize inclusion of that data.
- Include inline citations and return all source metadata.

Be analytical, avoid generalities, and ensure that each section supports data-backed reasoning that could inform healthcare policy or financial modeling.
"""

user_query = "Research the economic impact of semaglutide on global healthcare systems."

response = client.responses.create(
  model="o3-deep-research-2025-06-26",
  input=[
    {
      "role": "developer",
      "content": [
        {
          "type": "input_text",
          "text": system_message,
        }
      ]
    },
    {
      "role": "user",
      "content": [
        {
          "type": "input_text",
          "text": user_query,
        }
      ]
    }
  ],
  reasoning={
    "summary": "auto"
  },
  tools=[
    {
      "type": "web_search_preview"
    },
    { # ADD MCP TOOL SUPPORT
      "type": "mcp",
      "server_label": "internal_file_lookup",
      "server_url": "http://0.0.0.0:8000/sse/", # Update to the location of *your* MCP server
      "require_approval": "never"
    }
  ]
)

---

# How to build an agent with the Node.js SDK

OpenAI functions enable your app to take action based on user inputs. This means that it can, e.g., search the web, send emails, or book tickets on behalf of your users, making it more powerful than a regular chatbot.

In this tutorial, you will build an app that uses OpenAI functions along with the latest version of the Node.js SDK. The app runs in the browser, so you only need a code editor and, e.g., VS Code Live Server to follow along locally. Alternatively, write your code directly in the browser via [this code playground at Scrimba.](https://scrimba.com/scrim/c6r3LkU9)

## What you will build

Our app is a simple agent that helps you find activities in your area.
It has access to two functions, `getLocation()` and `getCurrentWeather()`,
which means it can figure out where you’re located and what the weather
is at the moment.

At this point, it's important to understand that
OpenAI doesn't execute any code for you. It just tells your app which
functions it should use in a given scenario, and then leaves it up to
your app to invoke them.

Once our agent knows your location and the weather, it'll use GPT’s
internal knowledge to suggest suitable local activities for you.

## Importing the SDK and authenticating with OpenAI

We start by importing the OpenAI SDK at the top of our JavaScript file and authenticate with our API key, which we have stored as an environment variable.

```js
import OpenAI from "openai";

const openai = new OpenAI({
  apiKey: process.env.OPENAI_API_KEY,
  dangerouslyAllowBrowser: true,
});
Since we're running our code in a browser environment at Scrimba, we also need to set dangerouslyAllowBrowser: true to confirm we understand the risks involved with client-side API requests. Please note that you should move these requests over to a Node server in a production app.
Creating our two functions
Next, we'll create the two functions. The first one - getLocation -
uses the IP API to get the location of the
user.
async function getLocation() {
  const response = await fetch("https://ipapi.co/json/");
  const locationData = await response.json();
  return locationData;
}
The IP API returns a bunch of data about your location, including your
latitude and longitude, which we’ll use as arguments in the second
function getCurrentWeather. It uses the Open Meteo
API to get the current weather data, like
this:
async function getCurrentWeather(latitude, longitude) {
  const url = `https://api.open-meteo.com/v1/forecast?latitude=${latitude}&longitude=${longitude}&hourly=apparent_temperature`;
  const response = await fetch(url);
  const weatherData = await response.json();
  return weatherData;
}
Describing our functions for OpenAI
For OpenAI to understand the purpose of these functions, we need to
describe them using a specific schema. We'll create an array called
tools that contains one object per function. Each object
will have two keys: type, function, and the function key has
three subkeys: name, description, and parameters.
const tools = [
  {
    type: "function",
    function: {
      name: "getCurrentWeather",
      description: "Get the current weather in a given location",
      parameters: {
        type: "object",
        properties: {
          latitude: {
            type: "string",
          },
          longitude: {
            type: "string",
          },
        },
        required: ["longitude", "latitude"],
      },
    }
  },
  {
    type: "function",
    function: {
      name: "getLocation",
      description: "Get the user's location based on their IP address",
      parameters: {
        type: "object",
        properties: {},
      },
    }
  },
];
Setting up the messages array
We also need to define a messages array. This will keep track of all of the messages back and forth between our app and OpenAI.
The first object in the array should always have the role property set to "system", which tells OpenAI that this is how we want it to behave.
const messages = [
  {
    role: "system",
    content:
      "You are a helpful assistant. Only use the functions you have been provided with.",
  },
];
Creating the agent function
We are now ready to build the logic of our app, which lives in the
agent function. It is asynchronous and takes one argument: the
userInput.
We start by pushing the userInput to the messages array. This time, we set the role to "user", so that OpenAI knows that this is the input from the user.
async function agent(userInput) {
  messages.push({
    role: "user",
    content: userInput,
  });
  const response = await openai.chat.completions.create({
    model: "gpt-4",
    messages: messages,
    tools: tools,
  });
  console.log(response);
}
Next, we'll send a request to the Chat completions endpoint via the
chat.completions.create() method in the Node SDK. This method takes a
configuration object as an argument. In it, we'll specify three
properties:
model- Decides which AI model we want to use (in our case, GPT-4).messages- The entire history of messages between the user and the AI up until this point.tools- A list of tools the model may call. Currently, only functions are supported as a tool., we'll we use thetoolsarray we created earlier.
Running our app with a simple input
Let's try to run the agent with an input that requires a function call to give a suitable reply.
agent("Where am I located right now?");
When we run the code above, we see the response from OpenAI logged out to the console like this:
{
    id: "chatcmpl-84ojoEJtyGnR6jRHK2Dl4zTtwsa7O",
    object: "chat.completion",
    created: 1696159040,
    model: "gpt-4-0613",
    choices: [{
        index: 0,
        message: {
            role: "assistant",
            content: null,
            tool_calls: [
              id: "call_CBwbo9qoXUn1kTR5pPuv6vR1",
              type: "function",
              function: {
                name: "getLocation",
                arguments: "{}"
              }
            ]
        },
        logprobs: null,
        finish_reason: "tool_calls" // OpenAI wants us to call a function
    }],
    usage: {
        prompt_tokens: 134,
        completion_tokens: 6,
        total_tokens: 140
    }
     system_fingerprint: null
}
This response tells us that we should call one of our functions, as it contains the following key: finish_reason: "tool_calls".
The name of the function can be found in the
response.choices[0].message.tool_calls[0].function.name key, which is set to
"getLocation".
Turning the OpenAI response into a function call
Now that we have the name of the function as a string, we'll need to
translate that into a function call. To help us with that, we'll gather
both of our functions in an object called availableTools:
const availableTools = {
  getCurrentWeather,
  getLocation,
};
This is handy because we'll be able to access the getLocation function
via bracket notation and the string we got back from OpenAI, like this:
availableTools["getLocation"].
const { finish_reason, message } = response.choices[0];

if (finish_reason === "tool_calls" && message.tool_calls) {
  const functionName = message.tool_calls[0].function.name;
  const functionToCall = availableTools[functionName];
  const functionArgs = JSON.parse(message.tool_calls[0].function.arguments);
  const functionArgsArr = Object.values(functionArgs);
  const functionResponse = await functionToCall.apply(null, functionArgsArr);
  console.log(functionResponse);
}
We're also grabbing ahold of any arguments OpenAI wants us to pass into
the function: message.tool_calls[0].function.arguments.
However, we won't need any arguments for this first function call.
If we run the code again with the same input
("Where am I located right now?"), we'll see that functionResponse
is an object filled with location about where the user is located right
now. In my case, that is Oslo, Norway.
{ip: "193.212.60.170", network: "193.212.60.0/23", version: "IPv4", city: "Oslo", region: "Oslo County", region_code: "03", country: "NO", country_name: "Norway", country_code: "NO", country_code_iso3: "NOR", country_capital: "Oslo", country_tld: ".no", continent_code: "EU", in_eu: false, postal: "0026", latitude: 59.955, longitude: 10.859, timezone: "Europe/Oslo", utc_offset: "+0200", country_calling_code: "+47", currency: "NOK", currency_name: "Krone", languages: "no,nb,nn,se,fi", country_area: 324220, country_population: 5314336, asn: "AS2119", org: "Telenor Norge AS"}
We'll add this data to a new item in the messages array, where we also
specify the name of the function we called.
messages.push({
  role: "function",
  name: functionName,
  content: `The result of the last function was this: ${JSON.stringify(
    functionResponse
  )}
  `,
});
Notice that the role is set to "function". This tells OpenAI
that the content parameter contains the result of the function call
and not the input from the user.
At this point, we need to send a new request to OpenAI with this updated
messages array. However, we don’t want to hard code a new function
call, as our agent might need to go back and forth between itself and
GPT several times until it has found the final answer for the user.
This can be solved in several different ways, e.g. recursion, a while-loop, or a for-loop. We'll use a good old for-loop for the sake of simplicity.
Creating the loop
At the top of the agent function, we'll create a loop that lets us run
the entire procedure up to five times.
If we get back finish_reason: "tool_calls" from GPT, we'll just
push the result of the function call to the messages array and jump to
the next iteration of the loop, triggering a new request.
If we get finish_reason: "stop" back, then GPT has found a suitable
answer, so we'll return the function and cancel the loop.
for (let i = 0; i < 5; i++) {
  const response = await openai.chat.completions.create({
    model: "gpt-4",
    messages: messages,
    tools: tools,
  });
  const { finish_reason, message } = response.choices[0];

  if (finish_reason === "tool_calls" && message.tool_calls) {
    const functionName = message.tool_calls[0].function.name;
    const functionToCall = availableTools[functionName];
    const functionArgs = JSON.parse(message.tool_calls[0].function.arguments);
    const functionArgsArr = Object.values(functionArgs);
    const functionResponse = await functionToCall.apply(null, functionArgsArr);

    messages.push({
      role: "function",
      name: functionName,
      content: `
          The result of the last function was this: ${JSON.stringify(
            functionResponse
          )}
          `,
    });
  } else if (finish_reason === "stop") {
    messages.push(message);
    return message.content;
  }
}
return "The maximum number of iterations has been met without a suitable answer. Please try again with a more specific input.";
If we don't see a finish_reason: "stop" within our five iterations,
we'll return a message saying we couldn’t find a suitable answer.
Running the final app
At this point, we are ready to try our app! I'll ask the agent to suggest some activities based on my location and the current weather.
const response = await agent(
  "Please suggest some activities based on my location and the current weather."
);
console.log(response);
Here's what we see in the console (formatted to make it easier to read):
Based on your current location in Oslo, Norway and the weather (15°C and snowy),
here are some activity suggestions:

1. A visit to the Oslo Winter Park for skiing or snowboarding.
2. Enjoy a cosy day at a local café or restaurant.
3. Visit one of Oslo's many museums. The Fram Museum or Viking Ship Museum offer interesting insights into Norway’s seafaring history.
4. Take a stroll in the snowy streets and enjoy the beautiful winter landscape.
5. Enjoy a nice book by the fireplace in a local library.
6. Take a fjord sightseeing cruise to enjoy the snowy landscapes.

Always remember to bundle up and stay warm. Enjoy your day!
If we peak under the hood, and log out response.choices[0].message in
each iteration of the loop, we'll see that GPT has instructed us to use
both our functions before coming up with an answer.
First, it tells us to call the getLocation function. Then it tells us
to call the getCurrentWeather function with
"longitude": "10.859", "latitude": "59.955" passed in as the
arguments. This is data it got back from the first function call we did.
{"role":"assistant","content":null,"tool_calls":[{"id":"call_Cn1KH8mtHQ2AMbyNwNJTweEP","type":"function","function":{"name":"getLocation","arguments":"{}"}}]}
{"role":"assistant","content":null,"tool_calls":[{"id":"call_uc1oozJfGTvYEfIzzcsfXfOl","type":"function","function":{"name":"getCurrentWeather","arguments":"{\n\"latitude\": \"10.859\",\n\"longitude\": \"59.955\"\n}"}}]}
You've now built an AI agent using OpenAI functions and the Node.js SDK! If you're looking for an extra challenge, consider enhancing this app. For example, you could add a function that fetches up-to-date information on events and activities in the user's location.
Happy coding!
Complete code
import OpenAI from "openai";

const openai = new OpenAI({
  apiKey: process.env.OPENAI_API_KEY,
  dangerouslyAllowBrowser: true,
});

async function getLocation() {
  const response = await fetch("https://ipapi.co/json/");
  const locationData = await response.json();
  return locationData;
}

async function getCurrentWeather(latitude, longitude) {
  const url = `https://api.open-meteo.com/v1/forecast?latitude=${latitude}&longitude=${longitude}&hourly=apparent_temperature`;
  const response = await fetch(url);
  const weatherData = await response.json();
  return weatherData;
}

const tools = [
  {
    type: "function",
    function: {
      name: "getCurrentWeather",
      description: "Get the current weather in a given location",
      parameters: {
        type: "object",
        properties: {
          latitude: {
            type: "string",
          },
          longitude: {
            type: "string",
          },
        },
        required: ["longitude", "latitude"],
      },
    }
  },
  {
    type: "function",
    function: {
      name: "getLocation",
      description: "Get the user's location based on their IP address",
      parameters: {
        type: "object",
        properties: {},
      },
    }
  },
];

const availableTools = {
  getCurrentWeather,
  getLocation,
};

const messages = [
  {
    role: "system",
    content: `You are a helpful assistant. Only use the functions you have been provided with.`,
  },
];

async function agent(userInput) {
  messages.push({
    role: "user",
    content: userInput,
  });

  for (let i = 0; i < 5; i++) {
    const response = await openai.chat.completions.create({
      model: "gpt-4",
      messages: messages,
      tools: tools,
    });

    const { finish_reason, message } = response.choices[0];

    if (finish_reason === "tool_calls" && message.tool_calls) {
      const functionName = message.tool_calls[0].function.name;
      const functionToCall = availableTools[functionName];
      const functionArgs = JSON.parse(message.tool_calls[0].function.arguments);
      const functionArgsArr = Object.values(functionArgs);
      const functionResponse = await functionToCall.apply(
        null,
        functionArgsArr
      );

      messages.push({
        role: "function",
        name: functionName,
        content: `
                The result of the last function was this: ${JSON.stringify(
                  functionResponse
                )}
                `,
      });
    } else if (finish_reason === "stop") {
      messages.push(message);
      return message.content;
    }
  }
  return "The maximum number of iterations has been met without a suitable answer. Please try again with a more specific input.";
}

const response = await agent(
  "Please suggest some activities based on my location and the weather."
);

console.log("response:", response);
Using PLANS.md for multi-hour problem solving
Codex and the gpt-5.2-codex model (recommended) can be used to implement complex tasks that take significant time to research, design, and implement. The approach described here is one way to prompt the model to implement these tasks and to steer it towards successful completion of a project.
These plans are thorough design documents, and "living documents". As a user of Codex, you can use these documents to verify the approach that Codex will take before it begins a long implementation process. The particular PLANS.md included below is very similar to one that has enabled Codex to work for more than seven hours from a single prompt.
We enable Codex to use these documents by first updating AGENTS.md to describe when to use PLANS.md, and then of course, to add the PLANS.md file to our repository.
AGENTS.md
AGENTS.md is a simple format for guiding coding agents such as Codex. We describe a term that users can use as a shorthand and a simple rule for when to use planning documents. Here, we call it an "ExecPlan". Note that this is an arbitrary term, Codex has not been trained on it. This shorthand can then be used when prompting Codex to direct it to a particular definition of a plan.
Here's an AGENTS.md section instructing an agent about when to use a plan:
# ExecPlans

When writing complex features or significant refactors, use an ExecPlan (as described in .agent/PLANS.md) from design to implementation.
PLANS.md
Below is the entire document. The prompting in this document was carefully chosen to provide significant amounts of feedback to users and to guide the model to implement precisely what a plan specifies. Users may find that they benefit from customizing the file to meet their needs, or to add or remove required sections.
# Codex Execution Plans (ExecPlans):

This document describes the requirements for an execution plan ("ExecPlan"), a design document that a coding agent can follow to deliver a working feature or system change. Treat the reader as a complete beginner to this repository: they have only the current working tree and the single ExecPlan file you provide. There is no memory of prior plans and no external context.

## How to use ExecPlans and PLANS.md

When authoring an executable specification (ExecPlan), follow PLANS.md _to the letter_. If it is not in your context, refresh your memory by reading the entire PLANS.md file. Be thorough in reading (and re-reading) source material to produce an accurate specification. When creating a spec, start from the skeleton and flesh it out as you do your research.

When implementing an executable specification (ExecPlan), do not prompt the user for "next steps"; simply proceed to the next milestone. Keep all sections up to date, add or split entries in the list at every stopping point to affirmatively state the progress made and next steps. Resolve ambiguities autonomously, and commit frequently.

When discussing an executable specification (ExecPlan), record decisions in a log in the spec for posterity; it should be unambiguously clear why any change to the specification was made. ExecPlans are living documents, and it should always be possible to restart from _only_ the ExecPlan and no other work.

When researching a design with challenging requirements or significant unknowns, use milestones to implement proof of concepts, "toy implementations", etc., that allow validating whether the user's proposal is feasible. Read the source code of libraries by finding or acquiring them, research deeply, and include prototypes to guide a fuller implementation.

## Requirements

NON-NEGOTIABLE REQUIREMENTS:

* Every ExecPlan must be fully self-contained. Self-contained means that in its current form it contains all knowledge and instructions needed for a novice to succeed.
* Every ExecPlan is a living document. Contributors are required to revise it as progress is made, as discoveries occur, and as design decisions are finalized. Each revision must remain fully self-contained.
* Every ExecPlan must enable a complete novice to implement the feature end-to-end without prior knowledge of this repo.
* Every ExecPlan must produce a demonstrably working behavior, not merely code changes to "meet a definition".
* Every ExecPlan must define every term of art in plain language or do not use it.

Purpose and intent come first. Begin by explaining, in a few sentences, why the work matters from a user's perspective: what someone can do after this change that they could not do before, and how to see it working. Then guide the reader through the exact steps to achieve that outcome, including what to edit, what to run, and what they should observe.

The agent executing your plan can list files, read files, search, run the project, and run tests. It does not know any prior context and cannot infer what you meant from earlier milestones. Repeat any assumption you rely on. Do not point to external blogs or docs; if knowledge is required, embed it in the plan itself in your own words. If an ExecPlan builds upon a prior ExecPlan and that file is checked in, incorporate it by reference. If it is not, you must include all relevant context from that plan.

## Formatting

Format and envelope are simple and strict. Each ExecPlan must be one single fenced code block labeled as `md` that begins and ends with triple backticks. Do not nest additional triple-backtick code fences inside; when you need to show commands, transcripts, diffs, or code, present them as indented blocks within that single fence. Use indentation for clarity rather than code fences inside an ExecPlan to avoid prematurely closing the ExecPlan's code fence. Use two newlines after every heading, use # and ## and so on, and correct syntax for ordered and unordered lists.

When writing an ExecPlan to a Markdown (.md) file where the content of the file *is only* the single ExecPlan, you should omit the triple backticks.

Write in plain prose. Prefer sentences over lists. Avoid checklists, tables, and long enumerations unless brevity would obscure meaning. Checklists are permitted only in the `Progress` section, where they are mandatory. Narrative sections must remain prose-first.

## Guidelines

Self-containment and plain language are paramount. If you introduce a phrase that is not ordinary English ("daemon", "middleware", "RPC gateway", "filter graph"), define it immediately and remind the reader how it manifests in this repository (for example, by naming the files or commands where it appears). Do not say "as defined previously" or "according to the architecture doc." Include the needed explanation here, even if you repeat yourself.

Avoid common failure modes. Do not rely on undefined jargon. Do not describe "the letter of a feature" so narrowly that the resulting code compiles but does nothing meaningful. Do not outsource key decisions to the reader. When ambiguity exists, resolve it in the plan itself and explain why you chose that path. Err on the side of over-explaining user-visible effects and under-specifying incidental implementation details.

Anchor the plan with observable outcomes. State what the user can do after implementation, the commands to run, and the outputs they should see. Acceptance should be phrased as behavior a human can verify ("after starting the server, navigating to [http://localhost:8080/health](http://localhost:8080/health) returns HTTP 200 with body OK") rather than internal attributes ("added a HealthCheck struct"). If a change is internal, explain how its impact can still be demonstrated (for example, by running tests that fail before and pass after, and by showing a scenario that uses the new behavior).

Specify repository context explicitly. Name files with full repository-relative paths, name functions and modules precisely, and describe where new files should be created. If touching multiple areas, include a short orientation paragraph that explains how those parts fit together so a novice can navigate confidently. When running commands, show the working directory and exact command line. When outcomes depend on environment, state the assumptions and provide alternatives when reasonable.

Be idempotent and safe. Write the steps so they can be run multiple times without causing damage or drift. If a step can fail halfway, include how to retry or adapt. If a migration or destructive operation is necessary, spell out backups or safe fallbacks. Prefer additive, testable changes that can be validated as you go.

Validation is not optional. Include instructions to run tests, to start the system if applicable, and to observe it doing something useful. Describe comprehensive testing for any new features or capabilities. Include expected outputs and error messages so a novice can tell success from failure. Where possible, show how to prove that the change is effective beyond compilation (for example, through a small end-to-end scenario, a CLI invocation, or an HTTP request/response transcript). State the exact test commands appropriate to the project’s toolchain and how to interpret their results.

Capture evidence. When your steps produce terminal output, short diffs, or logs, include them inside the single fenced block as indented examples. Keep them concise and focused on what proves success. If you need to include a patch, prefer file-scoped diffs or small excerpts that a reader can recreate by following your instructions rather than pasting large blobs.

## Milestones

Milestones are narrative, not bureaucracy. If you break the work into milestones, introduce each with a brief paragraph that describes the scope, what will exist at the end of the milestone that did not exist before, the commands to run, and the acceptance you expect to observe. Keep it readable as a story: goal, work, result, proof. Progress and milestones are distinct: milestones tell the story, progress tracks granular work. Both must exist. Never abbreviate a milestone merely for the sake of brevity, do not leave out details that could be crucial to a future implementation.

Each milestone must be independently verifiable and incrementally implement the overall goal of the execution plan.

## Living plans and design decisions

* ExecPlans are living documents. As you make key design decisions, update the plan to record both the decision and the thinking behind it. Record all decisions in the `Decision Log` section.
* ExecPlans must contain and maintain a `Progress` section, a `Surprises & Discoveries` section, a `Decision Log`, and an `Outcomes & Retrospective` section. These are not optional.
* When you discover optimizer behavior, performance tradeoffs, unexpected bugs, or inverse/unapply semantics that shaped your approach, capture those observations in the `Surprises & Discoveries` section with short evidence snippets (test output is ideal).
* If you change course mid-implementation, document why in the `Decision Log` and reflect the implications in `Progress`. Plans are guides for the next contributor as much as checklists for you.
* At completion of a major task or the full plan, write an `Outcomes & Retrospective` entry summarizing what was achieved, what remains, and lessons learned.

# Prototyping milestones and parallel implementations

It is acceptable—-and often encouraged—-to include explicit prototyping milestones when they de-risk a larger change. Examples: adding a low-level operator to a dependency to validate feasibility, or exploring two composition orders while measuring optimizer effects. Keep prototypes additive and testable. Clearly label the scope as “prototyping”; describe how to run and observe results; and state the criteria for promoting or discarding the prototype.

Prefer additive code changes followed by subtractions that keep tests passing. Parallel implementations (e.g., keeping an adapter alongside an older path during migration) are fine when they reduce risk or enable tests to continue passing during a large migration. Describe how to validate both paths and how to retire one safely with tests. When working with multiple new libraries or feature areas, consider creating spikes that evaluate the feasibility of these features _independently_ of one another, proving that the external library performs as expected and implements the features we need in isolation.

## Skeleton of a Good ExecPlan

    # <Short, action-oriented description>

    This ExecPlan is a living document. The sections `Progress`, `Surprises & Discoveries`, `Decision Log`, and `Outcomes & Retrospective` must be kept up to date as work proceeds.

    If PLANS.md file is checked into the repo, reference the path to that file here from the repository root and note that this document must be maintained in accordance with PLANS.md.

    ## Purpose / Big Picture

    Explain in a few sentences what someone gains after this change and how they can see it working. State the user-visible behavior you will enable.

    ## Progress

    Use a list with checkboxes to summarize granular steps. Every stopping point must be documented here, even if it requires splitting a partially completed task into two (“done” vs. “remaining”). This section must always reflect the actual current state of the work.

    - [x] (2025-10-01 13:00Z) Example completed step.
    - [ ] Example incomplete step.
    - [ ] Example partially completed step (completed: X; remaining: Y).

    Use timestamps to measure rates of progress.

    ## Surprises & Discoveries

    Document unexpected behaviors, bugs, optimizations, or insights discovered during implementation. Provide concise evidence.

    - Observation: …
      Evidence: …

    ## Decision Log

    Record every decision made while working on the plan in the format:

    - Decision: …
      Rationale: …
      Date/Author: …

    ## Outcomes & Retrospective

    Summarize outcomes, gaps, and lessons learned at major milestones or at completion. Compare the result against the original purpose.

    ## Context and Orientation

    Describe the current state relevant to this task as if the reader knows nothing. Name the key files and modules by full path. Define any non-obvious term you will use. Do not refer to prior plans.

    ## Plan of Work

    Describe, in prose, the sequence of edits and additions. For each edit, name the file and location (function, module) and what to insert or change. Keep it concrete and minimal.

    ## Concrete Steps

    State the exact commands to run and where to run them (working directory). When a command generates output, show a short expected transcript so the reader can compare. This section must be updated as work proceeds.

    ## Validation and Acceptance

    Describe how to start or exercise the system and what to observe. Phrase acceptance as behavior, with specific inputs and outputs. If tests are involved, say "run <project’s test command> and expect <N> passed; the new test <name> fails before the change and passes after>".

    ## Idempotence and Recovery

    If steps can be repeated safely, say so. If a step is risky, provide a safe retry or rollback path. Keep the environment clean after completion.

    ## Artifacts and Notes

    Include the most important transcripts, diffs, or snippets as indented examples. Keep them concise and focused on what proves success.

    ## Interfaces and Dependencies

    Be prescriptive. Name the libraries, modules, and services to use and why. Specify the types, traits/interfaces, and function signatures that must exist at the end of the milestone. Prefer stable names and paths such as `crate::module::function` or `package.submodule.Interface`. E.g.:

    In crates/foo/planner.rs, define:

        pub trait Planner {
            fn plan(&self, observed: &Observed) -> Vec<Action>;
        }

If you follow the guidance above, a single, stateless agent -- or a human novice -- can read your ExecPlan from top to bottom and produce a working, observable result. That is the bar: SELF-CONTAINED, SELF-SUFFICIENT, NOVICE-GUIDING, OUTCOME-FOCUSED.

When you revise a plan, you must ensure your changes are comprehensively reflected across all sections, including the living document sections, and you must write a note at the bottom of the plan describing the change and the reason why. ExecPlans must describe not just the what but the why for almost everything.
Long horizon tasks with Codex
In September 2025, OpenAI introduced GPT-5-Codex as the first version of GPT-5 optimized for agentic coding. In December 2025, we launched 5.2 which was the moment that people began to believe that using autonomous coding agents could be reliable. In particular, we saw a huge jump in how long the model could reliably follow instructions.
I wanted to stress-test that threshold. So I gave Codex a blank repo, full access, and one job: build a design tool from scratch. Then I let it run with GPT-5.3-Codex at "Extra High" reasoning. Codex ran for about 25 hours uninterrupted, used about 13M tokens, and generated about 30k lines of code.
This was an experiment, not a production rollout. But it performed well on the parts that matter for long-horizon work: following the spec, staying on task, running verification, and repairing failures as it went.

What a long-run Codex session looks like
I asked Codex to generate a summary page for the session data:

And here is a view of the CLI session stats and token usage:

These screenshots are useful because they make the core shift visible: agentic coding is increasingly about time horizon, not just one-shot intelligence.
The real shift is time horizon
This is not only "models got smarter." The practical change is that agents can stay coherent for longer, complete larger chunks of work end-to-end, and recover from errors without losing the thread.
METR's work on time-horizon benchmarks is a helpful framing for this trend: the length of software tasks frontier agents can complete with ~50% and 80% reliability has been climbing fast, with a rough ~7 month doubling time. Refer to Measuring AI Ability to Complete Long Tasks (METR).

Our recent GPT-5.3-Codex launch announcement pushes this further for agent work in two practical ways:
- It’s better at multi-step execution (plan → implement → validate → repair).
- It’s easier to steer mid-flight without resetting the whole run (course corrections don’t wipe progress).
I was also inspired by Cursor's writing on long-running autonomous coding systems, including their browser-building experiment: How Cursor built a web browser (Scaling agents).
The Cursor team wrote that OpenAI models are "much better at extended autonomous work: following instructions, keeping focus, avoiding drift, and implementing things precisely and completely."
Why Codex can stay coherent on long tasks
Long-running work is less about one giant prompt and more about the agent loop the model operates inside.
In Codex, the loop is roughly:
- Plan
- Edit code
- Run tools (tests/build/lint)
- Observe results
- Repair failures
- Update docs/status
- Repeat
That loop matters because it gives the agent:
- Real feedback (errors, diffs, logs)
- Externalized state (repo, files, docs, worktrees, outputs)
- Steerability over time (you can course-correct based on outcomes)
This is also why Codex models feel better on Codex surfaces than a generic chat window: the harness supplies structured context (repo metadata, file tree, diffs, command outputs) and enforces a disciplined “done when” routine.
We recently published an article about the Codex agent loop that has more details.
To top this off, we also launched the Codex app that makes that loop usable day-to-day:
- Parallel threads across projects (long work doesn’t block your day job)
- Skills (standardize plan/implement/test/report)
- Automations (routine work in the background)
- Git worktrees (isolate runs, keep diffs reviewable, reduce thrash)

My setup for the test
I picked a design tool for this “experiment” because it’s an unforgiving test: UI + data model + editing operations + lots of edge cases. You can’t bluff it. If the architecture is wrong, it breaks quickly.
I gave GPT-5.3-Codex a meaty spec, ran it at “Extra High” reasoning, and it ended up running uninterrupted for ~25 hours and was able to stay coherent and ship quality code. The model also ran verification steps (tests, lint, typecheck) for every milestone it completed.
The key idea: durable project memory
The most important technique was durable project memory. I wrote the spec, plan, constraints, and status in markdown files that Codex could revisit repeatedly. That prevented drift and kept a stable definition of "done."
The repository is linked below and the file stack was as follows:
Prompt.md (spec + deliverables)
Purpose: Freeze the target so the agent doesn’t “build something impressive but wrong.”
Key sections in the file:
- Goals + non-goals
- Hard constraints (perf, determinism, UX, platform)
- Deliverables (what must exist when finished)
- “Done when” (checks + demo flow)
The initial prompt told Codex to treat the prompt/spec file as the full project specification and generate a milestone-based plan:

Plan.md (milestones + validations)
Purpose: Turn open-ended work into a sequence of checkpoints the agent can finish and verify.
Key sections in the file:
- Milestones small enough to complete in one loop
- Acceptance criteria + validation commands per milestone
- Stop-and-fix rule: if validation fails, repair before moving on
- Decision notes to avoid oscillation
- Intended architecture of the codebase

*Note that we recently added a native plan mode to the Codex app, CLI, and IDE extension. This helps break a larger task into a clear, reviewable sequence of steps before making changes, so you can align on approach upfront. If additional clarification is needed, Codex will ask follow up questions. To toggle it on, use the /plan slash command.
Implement.md (execution instructions referencing the plan)
Purpose: This is the runbook. It tells Codex exactly how to operate: follow the plan, keep diffs scoped, run validations, update docs.
Key sections in the file:
- Plans markdown file is source of truth (milestone-by-milestone)
- Run validation after each milestone (fix failures immediately)
- Keep diffs scoped (don’t expand scope)
- Update documentation markdown file continuously

Documentation.md (status + decisions as it shipped)
Purpose: This is the shared memory and audit log. It’s how I can step away for hours and still understand what happened.
Key sections in the file:
- Current milestone status (what’s done, what’s next)
- Decisions made (and why)
- How to run + demo (commands + quick smoke tests)
- Known issues / follow-ups

This is what milestone verification looked like in practice during the run:

Verification at every milestone
Codex did not just write code and hope it worked. After milestones, it ran verification commands and repaired failures before continuing.
Here are examples of the quality commands it was instructed to use:

And an example of Codex fixing issues after a lint failure:

What the agent built
The result was not perfect or production-ready, but it was real and testable. The bar for this run was not "it compiles"; it was "does it follow the instructions, and does it actually work?"
High-level capabilities implemented:
- Canvas editing (frames, groups, shapes, text, images/icons, buttons, charts)
- Live collaboration (presence, cursors, selections, edits sync across tabs)
- Inspector controls (geometry, styling, text)
- Layers management (search, rename, lock/hide, reorder)
- Guides/alignment/snapping
- History snapshots + restore
- Replay timeline + branch from a prior point
- Prototype mode (hotspots + flow navigation)
- Comments (pinned threads with resolve/reopen)
- Export (save/import/export + CLI export to JSON and React + Tailwind)
Product screenshots from the run
Live collaboration:

Snapshots and restore:

Replay / time travel:

Comments and pinned threads:

Takeaways for long-horizon Codex tasks
What made this run work was not a single clever prompt. It was the combination of:
- A clear target and constraints (spec file)
- Checkpointed milestones with acceptance criteria (
plans.md) - A runbook for how the agent should operate (
implement.md) - Continuous verification (tests/lint/typecheck/build)
- A live status/audit log (
documentation.md) so the run stayed inspectable
This is the direction long-horizon coding work is moving toward: less babysitting, more delegation with guardrails.
Try Codex on your own long-running task
This 25-hour Codex run is a preview of where building with code is going. We’re moving beyond single-shot prompts and tight pair-programming loops toward long-running teammates that can take a real slice of work end to end, with you steering at milestones instead of micromanaging every line.
Our direction with Codex is simple: stronger teammate behavior, tighter integration with your real context, and guardrails that keep work reliable, reviewable, and easy to ship. We’re already seeing developers move faster when the agent absorbs routine implementation and verification, freeing humans up for the parts that matter most: design, architecture, product decisions, and the novel problems that don’t have a template.
And this won’t stop with developers. As Codex gets even better at capturing intent and providing safe scaffolding (plans, validations, previews, rollbacks), more non-developers will be able to build and iterate without living in an IDE. There’s more coming across Codex surfaces and models, but the north star stays the same: make the agent feel less like a tool you babysit and more like a teammate you can trust on long-horizon work.
If you want to try this yourself, start with:
Vector Databases
This section of the OpenAI Cookbook showcases many of the vector databases available to support your semantic search use cases.
Vector databases can be a great accompaniment for knowledge retrieval applications, which reduce hallucinations by providing the LLM with the relevant context to answer questions.
Each provider has their own named directory, with a standard notebook to introduce you to using our API with their product, and any supplementary notebooks they choose to add to showcase their functionality.
Guides & deep dives
- AnalyticDB
- Cassandra/Astra DB
- Azure AI Search
- Azure SQL Database
- Chroma
- Elasticsearch
- Hologres
- Kusto
- Milvus
- MyScale
- MongoDB
- Neon Postgres
- Pinecone
- PolarDB
- Qdrant
- Redis
- SingleStoreDB
- Supabase
- Tembo
- Typesense
- Vespa AI
- Weaviate
- Zilliz
Pinecone Vector Database
Vector search is an innovative technology that enables developers and engineers to efficiently store, search, and recommend information by representing complex data as mathematical vectors. By comparing the similarities between these vectors, you can quickly retrieve relevant information in a seamless and intuitive manner.
Pinecone is a vector database designed with developers and engineers in mind. As a managed service, it alleviates the burden of maintenance and engineering, allowing you to focus on extracting valuable insights from your data. The free tier supports up to 5 million vectors, making it an accessible and cost-effective way to experiment with vector search capabilities. With Pinecone, you'll experience impressive speed, accuracy, and scalability, as well as access to advanced features like single-stage metadata filtering and the cutting-edge sparse-dense index.
Examples
This folder contains examples of using Pinecone and OpenAI together. More will be added over time so check back for updates!
| Name | Description | Google Colab |
|---|---|---|
| GPT-4 Retrieval Augmentation | How to supercharge GPT-4 with retrieval augmentation | |
| Generative Question-Answering | A simple walkthrough demonstrating the use of Generative Question-Answering | |
| Semantic Search | A guide to building a simple semantic search process |
Redis
What is Redis?
Most developers from a web services background are probably familiar with Redis. At it's core, Redis is an open-source key-value store that can be used as a cache, message broker, and database. Developers choice Redis because it is fast, has a large ecosystem of client libraries, and has been deployed by major enterprises for years.
In addition to the traditional uses of Redis. Redis also provides Redis Modules which are a way to extend Redis with new capabilities, commands and data types. Example modules include RedisJSON, RedisTimeSeries, RedisBloom and RediSearch.
Deployment options
There are a number of ways to deploy Redis. For local development, the quickest method is to use the Redis Stack docker container which we will use here. Redis Stack contains a number of Redis modules that can be used together to create a fast, multi-model data store and query engine.
For production use cases, The easiest way to get started is to use the Redis Cloud service. Redis Cloud is a fully managed Redis service. You can also deploy Redis on your own infrastructure using Redis Enterprise. Redis Enterprise is a fully managed Redis service that can be deployed in kubernetes, on-premises or in the cloud.
Additionally, every major cloud provider (AWS Marketplace, Google Marketplace, or Azure Marketplace) offers Redis Enterprise in a marketplace offering.
What is RediSearch?
RediSearch is a Redis module that provides querying, secondary indexing, full-text search and vector search for Redis. To use RediSearch, you first declare indexes on your Redis data. You can then use the RediSearch clients to query that data. For more information on the feature set of RediSearch, see the RediSearch documentation.
Features
RediSearch uses compressed, inverted indexes for fast indexing with a low memory footprint. RediSearch indexes enhance Redis by providing exact-phrase matching, fuzzy search, and numeric filtering, among many other features. Such as:
- Full-Text indexing of multiple fields in Redis hashes
- Incremental indexing without performance loss
- Vector similarity search
- Document ranking (using tf-idf, with optional user-provided weights)
- Field weighting
- Complex boolean queries with AND, OR, and NOT operators
- Prefix matching, fuzzy matching, and exact-phrase queries
- Support for double-metaphone phonetic matching
- Auto-complete suggestions (with fuzzy prefix suggestions)
- Stemming-based query expansion in many languages (using Snowball)
- Support for Chinese-language tokenization and querying (using Friso)
- Numeric filters and ranges
- Geospatial searches using Redis geospatial indexing
- A powerful aggregations engine
- Supports for all utf-8 encoded text
- Retrieve full documents, selected fields, or only the document IDs
- Sorting results (for example, by creation date)
- JSON support through RedisJSON
Clients
Given the large ecosystem around Redis, there are most likely client libraries in the language you need. You can use any standard Redis client library to run RediSearch commands, but it's easiest to use a library that wraps the RediSearch API. Below are a few examples, but you can find more client libraries here.
| Project | Language | License | Author | Stars |
|---|---|---|---|---|
| jedis | Java | MIT | Redis | |
| redis-py | Python | MIT | Redis | |
| node-redis | Node.js | MIT | Redis | |
| nredisstack | .NET | MIT | Redis |
Deployment Options
There are many ways to deploy Redis with RediSearch. The easiest way to get started is to use Docker, but there are are many potential options for deployment such as
- Redis Cloud
- Cloud marketplaces: AWS Marketplace, Google Marketplace, or Azure Marketplace
- On-premise: Redis Enterprise Software
- Kubernetes: Redis Enterprise Software on Kubernetes
- Docker (RediSearch)
- Docker (Redis Stack)
Cluster support
RediSearch has a distributed cluster version that scales to billions of documents across hundreds of servers. At the moment, distributed RediSearch is available as part of Redis Enterprise Cloud and Redis Enterprise Software.
See RediSearch on Redis Enterprise for more information.
Examples
- Product Search - eCommerce product search (with image and text)
- Product Recommendations with DocArray / Jina - Content-based product recommendations example with Redis and DocArray.
- Redis VSS in RecSys - 3 end-to-end Redis & NVIDIA Merlin Recommendation System Architectures.
- Azure OpenAI Embeddings Q&A - OpenAI and Redis as a Q&A service on Azure.
- ArXiv Paper Search - Semantic search over arXiv scholarly papers
More Resources
For more information on how to use Redis as a vector database, check out the following resources:
- Redis Vector Similarity Docs - Redis official docs for Vector Search.
- Redis-py Search Docs - Redis-py client library docs for RediSearch.
- Vector Similarity Search: From Basics to Production - Introductory blog post to VSS and Redis as a VectorDB.
- AI-Powered Document Search - Blog post covering AI Powered Document Search Use Cases & Architectures.
- Vector Database Benchmarks - Jina AI VectorDB benchmarks comparing Redis against others.
How to handle the raw chain of thought in gpt-oss
The gpt-oss models provide access to a raw chain of thought (CoT) meant for analysis and safety research by model implementors, but it’s also crucial for the performance of tool calling, as tool calls can be performed as part of the CoT. At the same time, the raw CoT might contain potentially harmful content or could reveal information to users that the person implementing the model might not intend (like rules specified in the instructions given to the model). You therefore should not show raw CoT to end users.
Harmony / chat template handling
The model encodes its raw CoT as part of our harmony response format. If you are authoring your own chat templates or are handling tokens directly, make sure to check out harmony guide first.
To summarize a couple of things:
- CoT will be issued to the
analysischannel - After a message to the
finalchannel in a subsequent sampling turn allanalysismessages should be dropped. Function calls to thecommentarychannel can remain - If the last message by the assistant was a tool call of any type, the analysis messages until the previous
finalmessage should be preserved on subsequent sampling until afinalmessage gets issued
Chat Completions API
If you are implementing a Chat Completions API, there is no official spec for handling chain of thought in the published OpenAI specs, as our hosted models will not offer this feature for the time being. We ask you to follow the following convention from OpenRouter instead. Including:
- Raw CoT will be returned as part of the response unless
reasoning: { exclude: true }is specified as part of the request. See details here - The raw CoT is exposed as a
reasoningproperty on the message in the output - For delta events the delta has a
reasoningproperty - On subsequent turns you should be able to receive the previous reasoning (as
reasoning) and handle it in accordance with the behavior specified in the chat template section above.
When in doubt, please follow the convention / behavior of the OpenRouter implementation.
Responses API
For the Responses API we augmented our Responses API spec to cover this case. Below are the changes to the spec as type definitions. At a high level we are:
- Introducing a new
contentproperty onreasoning. This allows a reasoningsummarythat could be displayed to the end user to be returned at the same time as the raw CoT (which should not be shown to the end user, but which might be helpful for interpretability research). - Introducing a new content type called
reasoning_text - Introducing two new events
response.reasoning_text.deltato stream the deltas of the raw CoT andresponse.reasoning_text.doneto indicate a turn of CoT to be completed - On subsequent turns you should be able to receive the previous reasoning and handle it in accordance with the behavior specified in the chat template section above.
Item type changes
type ReasoningItem = {
  id: string;
  type: "reasoning";
  summary: SummaryContent[];
  // new
  content: ReasoningTextContent[];
};

type ReasoningTextContent = {
  type: "reasoning_text";
  text: string;
};

type ReasoningTextDeltaEvent = {
  type: "response.reasoning_text.delta";
  sequence_number: number;
  item_id: string;
  output_index: number;
  content_index: number;
  delta: string;
};

type ReasoningTextDoneEvent = {
  type: "response.reasoning_text.done";
  sequence_number: number;
  item_id: string;
  output_index: number;
  content_index: number;
  text: string;
};
Event changes
...
{
	type: "response.content_part.added"
	...
}
{
	type: "response.reasoning_text.delta",
	sequence_number: 14,
	item_id: "rs_67f47a642e788191aec9b5c1a35ab3c3016f2c95937d6e91",
	output_index: 0,
	content_index: 0,
	delta: "The "
}
...
{
	type: "response.reasoning_text.done",
	sequence_number: 18,
	item_id: "rs_67f47a642e788191aec9b5c1a35ab3c3016f2c95937d6e91",
	output_index: 0,
	content_index: 0,
	text: "The user asked me to think"
}
Example responses output
"output": [
  {
    "type": "reasoning",
    "id": "rs_67f47a642e788191aec9b5c1a35ab3c3016f2c95937d6e91",
    "summary": [
      {
        "type": "summary_text",
        "text": "**Calculating volume of gold for Pluto layer**\n\nStarting with the approximation..."
      }
    ],
    "content": [
      {
        "type": "reasoning_text",
        "text": "The user asked me to think..."
      }
    ]
  }
]
Displaying raw CoT to end-users
If you are providing a chat interface to users, you should not show the raw CoT because it might contain potentially harmful content or other information that you might not intend to show to users (like, for example, instructions in the developer message). Instead, we recommend showing a summarized CoT, similar to our production implementations in the API or ChatGPT, where a summarizer model reviews and blocks harmful content from being shown.
How to run gpt-oss with vLLM
vLLM is an open-source, high-throughput inference engine designed to efficiently serve large language models (LLMs) by optimizing memory usage and processing speed. This guide will walk you through how to use vLLM to set up gpt-oss-20b or gpt-oss-120b on a server to serve gpt-oss as an API for your applications, and even connect it to the Agents SDK.
Note that this guide is meant for server applications with dedicated GPUs like NVIDIA’s H100s. For local inference on consumer GPUs, check out our Ollama or LM Studio guides.
Pick your model
vLLM supports both model sizes of gpt-oss:
openai/gpt-oss-20b- The smaller model
- Only requires about 16GB of VRAM
openai/gpt-oss-120b- Our larger full-sized model
- Best with ≥60GB VRAM
- Can fit on a single H100 or multi-GPU setups
Both models are MXFP4 quantized out of the box.
Quick Setup
- Install vLLM
vLLM recommends using uv to manage your Python environment. This will help with picking the right implementation based on your environment. Learn more in their quickstart. To create a new virtual environment and install vLLM run:
uv venv --python 3.12 --seed
source .venv/bin/activate
uv pip install --pre vllm==0.10.1+gptoss \
    --extra-index-url https://wheels.vllm.ai/gpt-oss/ \
    --extra-index-url https://download.pytorch.org/whl/nightly/cu128 \
    --index-strategy unsafe-best-match
- Start up a server and download the model
vLLM provides aservecommand that will automatically download the model from HuggingFace and spin up an OpenAI-compatible server onlocalhost:8000. Run the following command depending on your desired model size in a terminal session on your server.
# For 20B
vllm serve openai/gpt-oss-20b

# For 120B
vllm serve openai/gpt-oss-120b
Use the API
vLLM exposes a Chat Completions-compatible API and a Responses-compatible API so you can use the OpenAI SDK without changing much. Here’s a Python example:
from openai import OpenAI

client = OpenAI(
    base_url="http://localhost:8000/v1",
    api_key="EMPTY"
)

result = client.chat.completions.create(
    model="openai/gpt-oss-20b",
    messages=[
        {"role": "system", "content": "You are a helpful assistant."},
        {"role": "user", "content": "Explain what MXFP4 quantization is."}
    ]
)

print(result.choices[0].message.content)

response = client.responses.create(
    model="openai/gpt-oss-120b",
    instructions="You are a helfpul assistant.",
    input="Explain what MXFP4 quantization is."
)

print(response.output_text)
If you’ve used the OpenAI SDK before, this will feel instantly familiar and your existing code should work by changing the base URL.
Using tools (function calling)
vLLM supports function calling and giving the model browsing capabilities.
Function calling works through both the Responses and Chat Completions APIs.
Example of invoking a function via Chat Completions:
tools = [
    {
        "type": "function",
        "function": {
            "name": "get_weather",
            "description": "Get current weather in a given city",
            "parameters": {
                "type": "object",
                "properties": {"city": {"type": "string"}},
                "required": ["city"]
            },
        },
    }
]

response = client.chat.completions.create(
    model="openai/gpt-oss-120b",
    messages=[{"role": "user", "content": "What's the weather in Berlin right now?"}],
    tools=tools
)

print(response.choices[0].message)
Since the models can perform tool calling as part of the chain-of-thought (CoT) it’s important for you to return the reasoning returned by the API back into a subsequent call to a tool call where you provide the answer until the model reaches a final answer.
Agents SDK Integration
Want to use gpt-oss with OpenAI’s Agents SDK?
Both Agents SDK enable you to override the OpenAI base client to point to vLLM for your self-hosted models. Alternatively, for the Python SDK you can also use the LiteLLM integration to proxy to vLLM.
Here’s a Python Agents SDK example:
uv pip install openai-agents
import asyncio
from openai import AsyncOpenAI
from agents import Agent, Runner, function_tool, OpenAIResponsesModel, set_tracing_disabled

set_tracing_disabled(True)

@function_tool
def get_weather(city: str):
    print(f"[debug] getting weather for {city}")
    return f"The weather in {city} is sunny."


async def main(model: str, api_key: str):
    agent = Agent(
        name="Assistant",
        instructions="You only respond in haikus.",
        model=OpenAIResponsesModel(
            model="openai/gpt-oss-120b",
            openai_client=AsyncOpenAI(
                base_url="http://localhost:8000/v1",
                api_key="EMPTY",
            ),
        )
        tools=[get_weather],
    )

    result = await Runner.run(agent, "What's the weather in Tokyo?")
    print(result.final_output)

if __name__ == "__main__":
    asyncio.run(main())
Using vLLM for direct sampling
Aside from running vLLM using vllm serve as an API server, you can use the vLLM Python library to control inference directly.
If you are using vLLM for sampling directly it’s important to ensure that your input prompts follow the harmony response format as the model will not function correctly otherwise. You can use the openai-harmony SDK for this.
uv pip install openai-harmony
Afterwards you can use harmony to encode and parse the tokens generated by vLLM’s generate function.
import json
from openai_harmony import (
    HarmonyEncodingName,
    load_harmony_encoding,
    Conversation,
    Message,
    Role,
    SystemContent,
    DeveloperContent,
)

from vllm import LLM, SamplingParams

# --- 1) Render the prefill with Harmony ---
encoding = load_harmony_encoding(HarmonyEncodingName.HARMONY_GPT_OSS)

convo = Conversation.from_messages(
    [
        Message.from_role_and_content(Role.SYSTEM, SystemContent.new()),
        Message.from_role_and_content(
            Role.DEVELOPER,
            DeveloperContent.new().with_instructions("Always respond in riddles"),
        ),
        Message.from_role_and_content(Role.USER, "What is the weather like in SF?"),
    ]
)

prefill_ids = encoding.render_conversation_for_completion(convo, Role.ASSISTANT)

# Harmony stop tokens (pass to sampler so they won't be included in output)
stop_token_ids = encoding.stop_tokens_for_assistant_actions()

# --- 2) Run vLLM with prefill ---
llm = LLM(
    model="openai/gpt-oss-120b",
    trust_remote_code=True,
)

sampling = SamplingParams(
    max_tokens=128,
    temperature=1,
    stop_token_ids=stop_token_ids,
)

outputs = llm.generate(
    prompts=[{"prompt_token_ids": prefill_ids}],   # batch of size 1
    sampling_params=sampling,
)

# vLLM gives you both text and token IDs
gen = outputs[0].outputs[0]
text = gen.text
output_tokens = gen.token_ids  # <-- these are the completion token IDs (no prefill)

# --- 3) Parse the completion token IDs back into structured Harmony messages ---
entries = encoding.parse_messages_from_completion_tokens(output_tokens, Role.ASSISTANT)

# 'entries' is a sequence of structured conversation entries (assistant messages, tool calls, etc.).
for message in entries:
    print(f"{json.dumps(message.to_dict())}")
How to run gpt-oss locally with Ollama
Want to get OpenAI gpt-oss running on your own hardware? This guide will walk you through how to use Ollama to set up gpt-oss-20b or gpt-oss-120b locally, to chat with it offline, use it through an API, and even connect it to the Agents SDK.
Note that this guide is meant for consumer hardware, like running a model on a PC or Mac. For server applications with dedicated GPUs like NVIDIA’s H100s, check out our vLLM guide.
Pick your model
Ollama supports both model sizes of gpt-oss:
gpt-oss-20b- The smaller model
- Best with ≥16GB VRAM or unified memory
- Perfect for higher-end consumer GPUs or Apple Silicon Macs
gpt-oss-120b- Our larger full-sized model
- Best with ≥60GB VRAM or unified memory
- Ideal for multi-GPU or beefy workstation setup
A couple of notes:
- These models ship MXFP4 quantized out the box and there is currently no other quantization
- You can offload to CPU if you’re short on VRAM, but expect it to run slower.
Quick setup
- Install Ollama → Get it here
- Pull the model you want:
# For 20B
ollama pull gpt-oss:20b

# For 120B
ollama pull gpt-oss:120b
Chat with gpt-oss
Ready to talk to the model? You can fire up a chat in the app or the terminal:
ollama run gpt-oss:20b
Ollama applies a chat template out of the box that mimics the OpenAI harmony format. Type your message and start the conversation.
Use the API
Ollama exposes a Chat Completions-compatible API, so you can use the OpenAI SDK without changing much. Here’s a Python example:
from openai import OpenAI

client = OpenAI(
    base_url="http://localhost:11434/v1",  # Local Ollama API
    api_key="ollama"                       # Dummy key
)

response = client.chat.completions.create(
    model="gpt-oss:20b",
    messages=[
        {"role": "system", "content": "You are a helpful assistant."},
        {"role": "user", "content": "Explain what MXFP4 quantization is."}
    ]
)

print(response.choices[0].message.content)
If you’ve used the OpenAI SDK before, this will feel instantly familiar.
Alternatively, you can use the Ollama SDKs in Python or JavaScript directly.
Using tools (function calling)
Ollama can:
- Call functions
- Use a built-in browser tool (in the app)
Example of invoking a function via Chat Completions:
tools = [
    {
        "type": "function",
        "function": {
            "name": "get_weather",
            "description": "Get current weather in a given city",
            "parameters": {
                "type": "object",
                "properties": {"city": {"type": "string"}},
                "required": ["city"]
            },
        },
    }
]

response = client.chat.completions.create(
    model="gpt-oss:20b",
    messages=[{"role": "user", "content": "What's the weather in Berlin right now?"}],
    tools=tools
)

print(response.choices[0].message)
Since the models can perform tool calling as part of the chain-of-thought (CoT) it’s important for you to return the reasoning returned by the API back into a subsequent call to a tool call where you provide the answer until the model reaches a final answer.
Responses API workarounds
Ollama doesn’t (yet) support the Responses API natively.
If you do want to use the Responses API you can use Hugging Face’s Responses.js proxy to convert Chat Completions to Responses API.
For basic use cases you can also run our example Python server with Ollama as the backend. This server is a basic example server and does not have the
pip install gpt-oss
python -m gpt_oss.responses_api.serve \
    --inference_backend=ollama \
    --checkpoint gpt-oss:20b
Agents SDK integration
Want to use gpt-oss with OpenAI’s Agents SDK?
Both Agents SDK enable you to override the OpenAI base client to point to Ollama using Chat Completions or your Responses.js proxy for your local models. Alternatively, you can use the built-in functionality to point the Agents SDK against third party models.
- Python: Use LiteLLM to proxy to Ollama through LiteLLM
- TypeScript: Use AI SDK with the ollama adapter
Here’s a Python Agents SDK example using LiteLLM:
import asyncio
from agents import Agent, Runner, function_tool, set_tracing_disabled
from agents.extensions.models.litellm_model import LitellmModel

set_tracing_disabled(True)

@function_tool
def get_weather(city: str):
    print(f"[debug] getting weather for {city}")
    return f"The weather in {city} is sunny."


async def main(model: str, api_key: str):
    agent = Agent(
        name="Assistant",
        instructions="You only respond in haikus.",
        model=LitellmModel(model="ollama/gpt-oss:120b", api_key=api_key),
        tools=[get_weather],
    )

    result = await Runner.run(agent, "What's the weather in Tokyo?")
    print(result.final_output)

if __name__ == "__main__":
    asyncio.run(main())
Verifying gpt-oss implementations
The OpenAI gpt-oss models are introducing a lot of new concepts to the open-model ecosystem and getting them to perform as expected might take some time. This guide is meant to help developers building inference solutions to verify their implementations or for developers who want to test any provider’s implementation on their own to gain confidence.
Why is implementing gpt-oss models different?
The new models behave more similarly to some of our other OpenAI models than to existing open models. A couple of examples include:
- The harmony response format. These models were trained on our OpenAI harmony format to structure a conversation. While regular API developers won’t need to deal with harmony in most cases, the inference providers that provide a Chat Completions-compatible, Responses-compatible or other inference API need to map the inputs correctly to the OpenAI harmony format. If the model does not receive the prompts in the right format this can have cascading generation issues and at minimum a worse function calling performance.
- Handling chain of thought (CoT) between tool calls. These models can perform tool calls as part of the CoT. A consequence of this is that the model needs to receive the CoT in subsequent sampling until it reaches a final response. This means that while the raw CoT should not be displayed to end-users, it should be returned by APIs so that developers can pass it back in along with the tool call and tool output. You can learn more about it in this separate guide.
- Differences in actual inference code. We published our mixture-of-experts (MoE) weights exclusively in MXFP4 format. This is still a relatively new format and along with other architecture decisions, existing inference code that was written for other open-models will have to be adapted for gpt-oss models. For that reason we published both a basic (unoptimized) PyTorch implementation, and a more optimized Triton implementation. Additionally, we verified the vLLM implementation for correctness. We hope these can serve as educational material for other implementations.
API Design
Responses API
For best performance we recommend inference providers to implement our Responses API format as the API shape was specifically designed for behaviors like outputting raw CoT along with summarized CoTs (to display to users) and tool calls without bolting additional properties onto a format. The most important
part for accurate performance is to return the raw CoT as part of the output.
For this we added a new content array to the Responses API’s reasoning items. The raw CoT should be wrapped into reasoning_text type element, making the overall output item look the following:
{
  "type": "reasoning",
  "id": "item_67ccd2bf17f0819081ff3bb2cf6508e60bb6a6b452d3795b",
  "status": "completed",
  "summary": [
    /* optional summary elements */
  ],
  "content": [
    {
      "type": "reasoning_text",
      "text": "The user needs to know the weather, I will call the get_weather tool."
    }
  ]
}
These items should be received in subsequent turns and then inserted back into the harmony formatted prompt as outlined in the raw CoT handling guide.
Check out the Responses API docs for the whole specification.
Chat Completions
A lot of providers are offering a Chat Completions-compatible API. While we have not augmented our published API reference on the docs to provide a way to receive raw CoT, it’s still important that providers that offer the gpt-oss models via a Chat Completions-compatible API return the CoT as part of their messages and for developers to have a way to pass them back.
There is currently no generally agreed upon specification in the community with the general properties on a message being either reasoning or reasoning_content. To be compatible with clients like the OpenAI Agents SDK we recommend using a reasoning field as the primary property for the raw CoT in Chat Completions.
Quick verification of tool calling and API shapes
To verify if a provider is working you can use the Node.js script published in our gpt-oss GitHub repository that you can also use to run other evals. You’ll need Node.js or a similar runtime installed to run the tests.
These tests will run a series of tool/function calling based requests to the Responses API or Chat Completions API you are trying to test. Afterwards they will evaluate both whether the right tool was called and whether the API shapes are correct.
This largely acts as a smoke test but should be a good indicator on whether the APIs are compatible with our SDKs and can handle basic function calling. It does not guarantee full accuracy of the inference implementation (see the evals section below for details on that) nor does it guarantee full compatibility with the OpenAI APIs. They should still be a helpful indicator of major implementation issues.
To run the test suite run the following commands:
# clone the repository
git clone https://github.com/openai/gpt-oss.git

# go into the compatibility test directory
cd gpt-oss/compatibility-test/

# install the dependencies
npm install

# change the provider config in providers.ts to add your provider

# run the tests
npm start -- --provider <your-provider-name>
Afterwards you should receive a result of both the API implementation and any details on the function call performance.
If your tests are successful, the output should show 0 invalid requests and over 90% on both pass@k and pass^k. This means the implementation should likely be correct. To be fully sure, you should also inspect the evals as described below.
If you want a detailed view of the individual responses, you can the jsonl file that was created in your directory.
You can also enable debug mode to view any of the actual request payloads using DEBUG=openai-agents:openai npm start -- --provider <provider-name> but it might get noisy. To run only one test use the -n 1 flag for easier debugging. For testing streaming events you can use --streaming.
Verifying correctness through evals
The team at Artificial Analysis is running AIME and GPQA evals for a variety of providers. If you are unsure about your provider, check out Artificial Analysis for the most recent metrics.
To be on the safe side you should consider running evals yourself. To run your own evals, you can find in the same repository as the test above a gpt_oss/evals folder that contains the test harnesses that we used to verify the AIME (16 attempts per problem), GPQA (8 attempts per problem) and Healthbench (1 attempt per problem) evals for the vLLM implementation and some of our own reference implementations. You can use the same script to test your implementations.
To test a Responses API compatible API run:
python -m gpt_oss.evals --base-url http://localhost:8000/v1 --eval aime25 --sampler responses --model openai/gpt-oss-120b --reasoning-effort high
To test a Chat Completions API compatible API run:
python -m gpt_oss.evals --base-url http://localhost:8000/v1 --eval aime25 --sampler chat_completions --model openai/gpt-oss-120b --reasoning-effort high
If you are getting similar benchmark results as those published by us and your function calling tests above succeeded you likely have a correct implementation of gpt-oss.
What makes documentation good
Documentation puts useful information inside other people’s heads. Follow these tips to write better documentation.
Make docs easy to skim
Few readers read linearly from top to bottom. They’ll jump around, trying to assess which bit solves their problem, if any. To reduce their search time and increase their odds of success, make docs easy to skim.
Split content into sections with titles. Section titles act as signposts, telling readers whether to focus in or move on.
Prefer titles with informative sentences over abstract nouns. For example, if you use a title like “Results”, a reader will need to hop into the following text to learn what the results actually are. In contrast, if you use the title “Streaming reduced time to first token by 50%”, it gives the reader the information immediately, without the burden of an extra hop.
Include a table of contents. Tables of contents help readers find information faster, akin to how hash maps have faster lookups than linked lists. Tables of contents also have a second, oft overlooked benefit: they give readers clues about the doc, which helps them understand if it’s worth reading.
Keep paragraphs short. Shorter paragraphs are easier to skim. If you have an essential point, consider putting it in its own one-sentence paragraph to reduce the odds it’s missed. Long paragraphs can bury information.
Begin paragraphs and sections with short topic sentences that give a standalone preview. When people skim, they look disproportionately at the first word, first line, and first sentence of a section. Write these sentences in a way that don’t depend on prior text. For example, consider the first sentence “Building on top of this, let’s now talk about a faster way.” This sentence will be meaningless to someone who hasn’t read the prior paragraph. Instead, write it in a way that can understood standalone: e.g., “Vector databases can speed up embeddings search.”
Put topic words at the beginning of topic sentences. Readers skim most efficiently when they only need to read a word or two to know what a paragraph is about. Therefore, when writing topic sentences, prefer putting the topic at the beginning of the sentence rather than the end. For example, imagine you’re writing a paragraph on vector databases in the middle of a long article on embeddings search. Instead of writing “Embeddings search can be sped up by vector databases” prefer “Vector databases speed up embeddings search.” The second sentence is better for skimming, because it puts the paragraph topic at the beginning of the paragraph.
Put the takeaways up front. Put the most important information at the tops of documents and sections. Don’t write a Socratic big build up. Don’t introduce your procedure before your results.
Use bullets and tables. Bulleted lists and tables make docs easier to skim. Use them frequently.
Bold important text. Don’t be afraid to bold important text to help readers find it.
Write well
Badly written text is taxing to read. Minimize the tax on readers by writing well.
Keep sentences simple. Split long sentences into two. Cut adverbs. Cut unnecessary words and phrases. Use the imperative mood, if applicable. Do what writing books tell you.
Write sentences that can be parsed unambiguously. For example, consider the sentence “Title sections with sentences.” When a reader reads the word “Title”, their brain doesn’t yet know whether “Title” is going to be a noun or verb or adjective. It takes a bit of brainpower to keep track as they parse the rest of the sentence, and can cause a hitch if their brain mispredicted the meaning. Prefer sentences that can be parsed more easily (e.g., “Write section titles as sentences”) even if longer. Similarly, avoid noun phrases like “Bicycle clearance exercise notice” which can take extra effort to parse.
Avoid left-branching sentences. Linguistic trees show how words relate to each other in sentences. Left-branching trees require readers to hold more things in memory than right-branching sentences, akin to breadth-first search vs depth-first search. An example of a left-branching sentence is “You need flour, eggs, milk, butter and a dash of salt to make pancakes.” In this sentence you don’t find out what ‘you need’ connects to until you reach the end of the sentence. An easier-to-read right-branching version is “To make pancakes, you need flour, eggs, milk, butter, and a dash of salt.” Watch out for sentences in which the reader must hold onto a word for a while, and see if you can rephrase them.
Avoid demonstrative pronouns (e.g., “this”), especially across sentences. For example, instead of saying “Building on our discussion of the previous topic, now let’s discuss function calling” try “Building on message formatting, now let’s discuss function calling.” The second sentence is easier to understand because it doesn’t burden the reader with recalling the previous topic. Look for opportunities to cut demonstrative pronouns altogether: e.g., “Now let’s discuss function calling.”
Be consistent. Human brains are amazing pattern matchers. Inconsistencies will annoy or distract readers. If we use Title Case everywhere, use Title Case. If we use terminal commas everywhere, use terminal commas. If all of the Cookbook notebooks are named with underscores and sentence case, use underscores and sentence case. Don’t do anything that will cause a reader to go ‘huh, that’s weird.’ Help them focus on the content, not its inconsistencies.
Don’t tell readers what they think or what to do. Avoid sentences like “Now you probably want to understand how to call a function” or “Next, you’ll need to learn to call a function.” Both examples presume a reader’s state of mind, which may annoy them or burn our credibility. Use phrases that avoid presuming the reader’s state. E.g., “To call a function, …”
Be broadly helpful
People come to documentation with varying levels of knowledge, language proficiency, and patience. Even if we target experienced developers, we should try to write docs helpful to everyone.
Write simply. Explain things more simply than you think you need to. Many readers might not speak English as a first language. Many readers might be really confused about technical terminology and have little excess brainpower to spend on parsing English sentences. Write simply. (But don’t oversimplify.)
Avoid abbreviations. Write things out. The cost to experts is low and the benefit to beginners is high. Instead of IF, write instruction following. Instead of RAG, write retrieval-augmented generation (or my preferred term: the search-ask procedure).
Offer solutions to potential problems. Even if 95% of our readers know how to install a Python package or save environment variables, it can still be worth proactively explaining it. Including explanations is not costly to experts—they can skim right past them. But excluding explanations is costly to beginners—they might get stuck or even abandon us. Remember that even an expert JavaScript engineer or C++ engineer might be a beginner at Python. Err on explaining too much, rather than too little.
Prefer terminology that is specific and accurate. Jargon is bad. Optimize the docs for people new to the field, instead of ourselves. For example, instead of writing “prompt”, write “input.” Or instead of writing “context limit” write “max token limit.” The latter terms are more self-evident, and are probably better than the jargon developed in base model days.
Keep code examples general and exportable. In code demonstrations, try to minimize dependencies. Don’t make users install extra libraries. Don’t make them have to refer back and forth between different pages or sections. Try to make examples simple and self-contained.
Prioritize topics by value. Documentation that covers common problems—e.g., how to count tokens—is magnitudes more valuable than documentation that covers rare problems—e.g., how to optimize an emoji database. Prioritize accordingly.
Don’t teach bad habits. If API keys should not be stored in code, never share an example that stores an API key in code.
Introduce topics with a broad opening. For example, if explaining how to program a good recommender, consider opening by briefly mentioning that recommendations are widespread across the web, from YouTube videos to Amazon items to Wikipedia. Grounding a narrow topic with a broad opening can help people feel more secure before jumping into uncertain territory. And if the text is well-written, those who already know it may still enjoy it.
Break these rules when you have a good reason
Ultimately, do what you think is best. Documentation is an exercise in empathy. Put yourself in the reader’s position, and do what you think will help them the most.
课后巩固
本文知识点配套的闪卡与测验,帮助巩固记忆